Enable emails to be sent to employees and job applicants

There is an important action that is needed to ensure reliability of outbound emails to your employees and job applicants, from your email address(es).

Records need to be added to your domain so Wrkplace (and email service Postmark) can reliably send emails from any email address on your domain.

We will email you instructions upon signing up to Wrkplace. We can also help you or your IT team with this process.

Specifically, these instructions will show you how to add DKIM and Return Path records to your domain name settings (DNS). A bit technical, but with our help, it’s not a big job.

If you are already a Prism subscriber, these records are likely to be already added to your DNS. In this case we will not email you instructions. Our onboarding team will check everything upon your Wrkplace account being enabled.

Direct all attendees to your government’s contact tracing app

Many country and state governments mandate that all attendees, including staff, check in to the relevant government contact tracing app at each workplace. That has typically meant workplaces had to display two QR code sign-in posters: Wrkplace’s QR code and the Government’s.

You can now direct all attendees to your country/state government’s check-in app via as new button displayed on attendee devices upon successful sign in.

This provides a seamless sign in experience, complies with government directions and eliminates the need to display two QR check in codes. You will only need one QR code sign-in poster: Wrkplace’s.

There are a few steps involved to achieve this seamless check in.

  1. Email us your government’s check in poster for your location(s).
  2. We will decode the QR code on that poster and record the redirection link required, and email that to you.
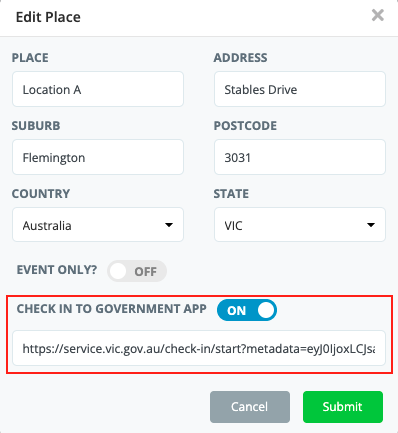
  3. Navigate to Configure > Places and edit each Place for which you wish to redirect attendees to the government app.
  4. Click the option “CHECK IN TO GOVERNMENT APP” to ON
  5. Paste the location-specific redirection link we provide you.

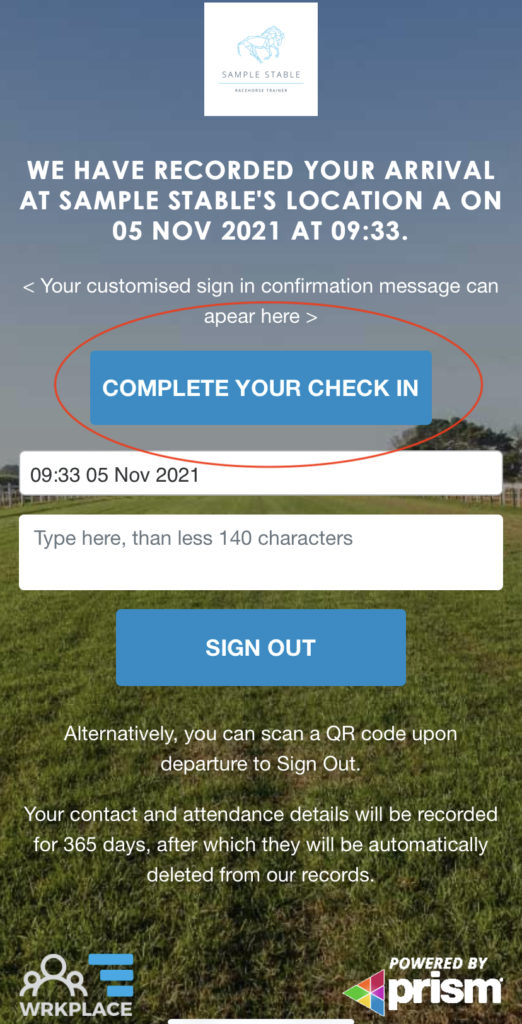
On the Sign In Confirmation screen a new button will appear, “COMPLETE YOUR CHECK IN”. 

Attendees should be encouraged to click this to open the Government app.

Note that we cannot automate the opening of the Government app for legal reasons. We do require the attendee to click the button, so education is important.

Likewise, we cannot force the closure of the government app and return to the Wrkplace sign in confirmation screen, as the display of vaccination certificates in the government app is important.

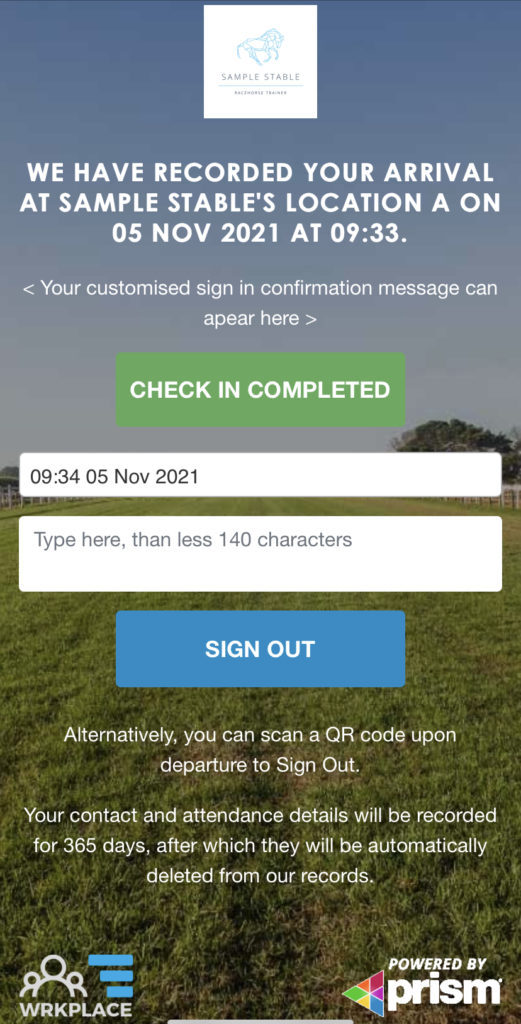
Nevertheless, the attendee can always return to their browser on their device. The button turns green and displays “CHECK IN COMPLETED”.

All of this means you can more confidently implement Wrkplace Attendance for each of your workplaces to:

  • Health screen each attendee and (optionally) record temperature;
  • Display Safety Notices and/or Policies on attendee devices for mandatory acceptance;
  • Display Sign In and/or Sign Out messages to share important information or links to your website;
  • Record timesheets for faster payroll processing;
  • Communicate with each attendee via email and/or SMS; and
  • Comply with government workplace attendance directions.

Send documents to employees for e-signature

The Wrkplace Recruitment module now allows employers to setup any number of document templates and email new or existing employees for electronic completion and signature. 

This article details how to send a document template for electronic signature. Please review how to create document templates for electronic signature before reading this article.


Send Document for e-signature

Once you have saved a document template or templates, you can populate any of those templates with data from an employee record and send for e-signature.

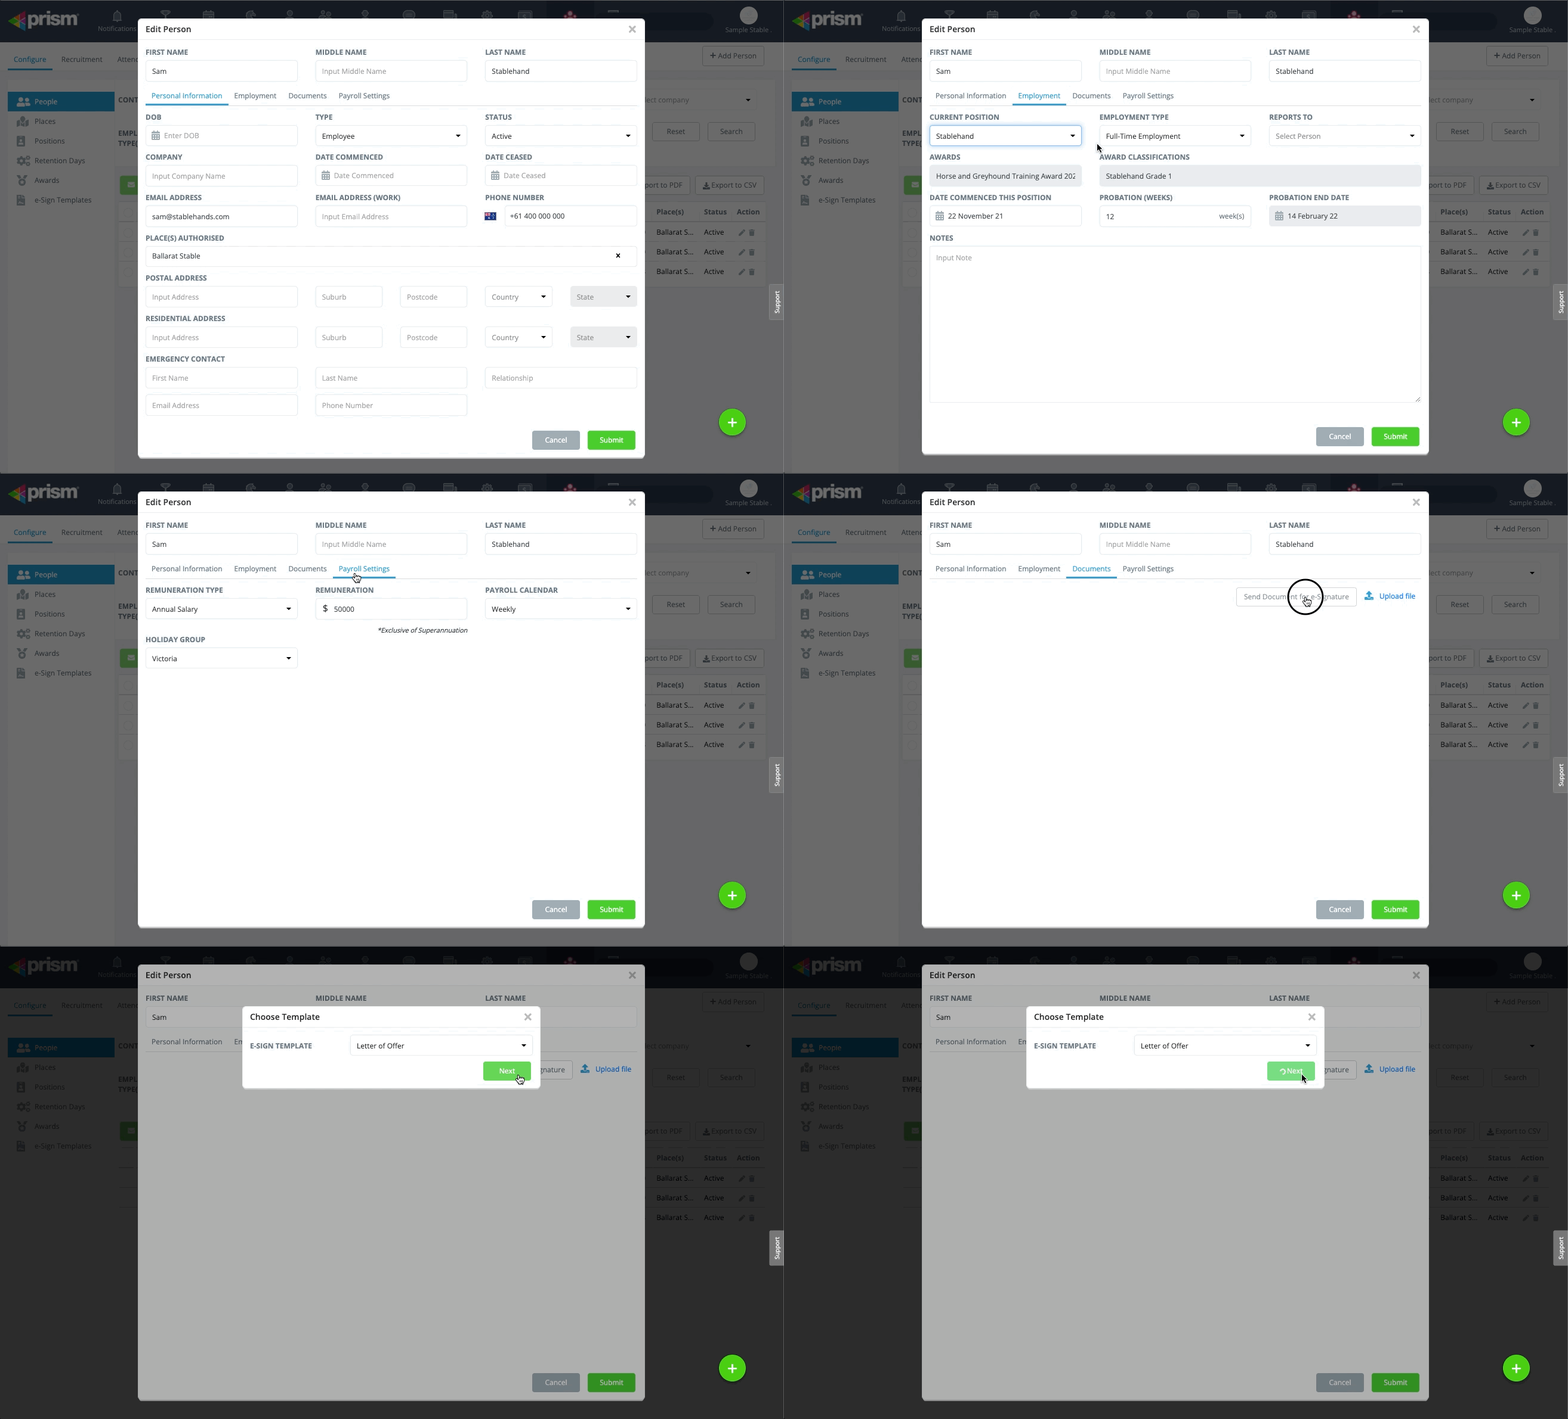
  • Navigate to Wrkplace > Configure > People
  • Select the Employee
  • Review Personal Information, Employment and Payroll information, and update where necessary. Some or all of this data may be configured to display in your templates
  • Navigate to the Documents tab
  • Click Send Document for e-Signature button
  • Select the Document Template

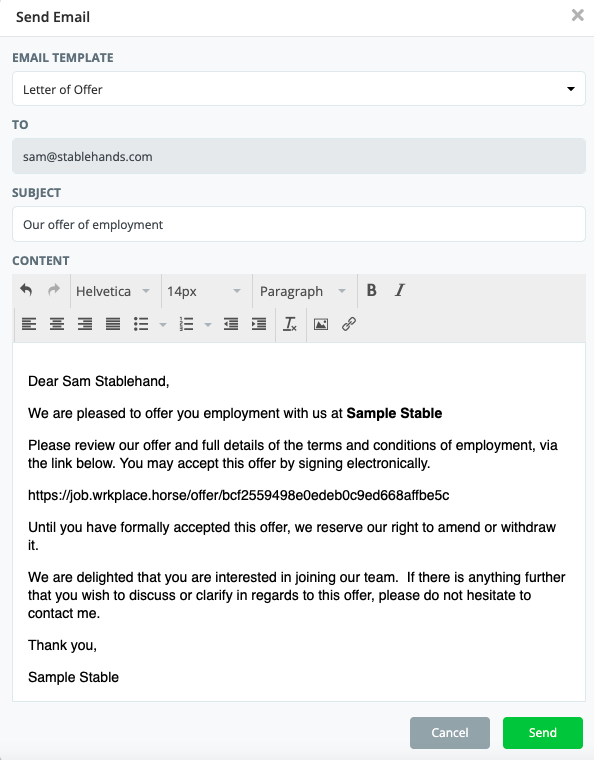
An email window will open. You can choose from two email templates:

  • a “letter of employment offer” template; or
  • a blank email template

After selecting your preferred email template, modify the email content if you desire.

Ensure you do not edit or move the URL of the document. This URL provides your employee with an easy way to click and sign.

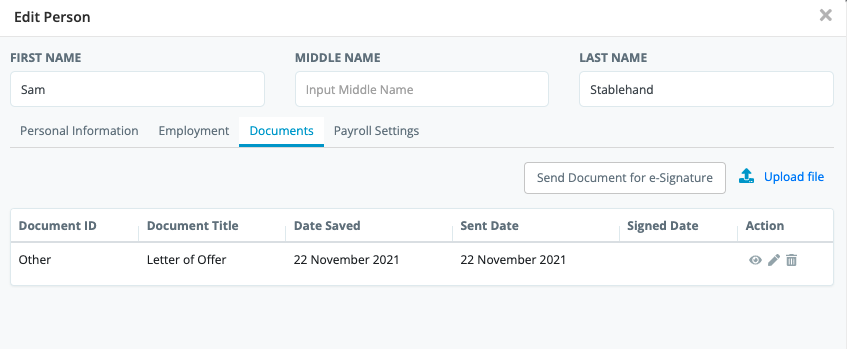
Upon sending, you will see the document added to the Documents tab in the Employee record, along with the date the document was sent.

Upon the employee signing the document:

  • you will be emailed a PDF version of the signed document;
  • the signed document will be saved and viewable in the Documents tab
  • the Signed Date will be updated

Create document templates for electronic signature

The Wrkplace Recruitment module now allows employers to setup any number of document templates and then email new or existing employees for electronic completion and signature. 

Adding new document templates and configuring them for electronic signature, is a breeze. Wrkplace integrates with renowned e-signature solution HelloSign for the most flexible and easiest template creation experience.

Whether you are sending an employment contract to a new hire or workplace policies to new or existing employees, the Wrkplace Recruitment module can save you and your employees hours of administration.

This article details the two steps to setup document templates:

  1. Upload document
  2. Decide who needs to sign and what data needs to be displayed

Upload Document

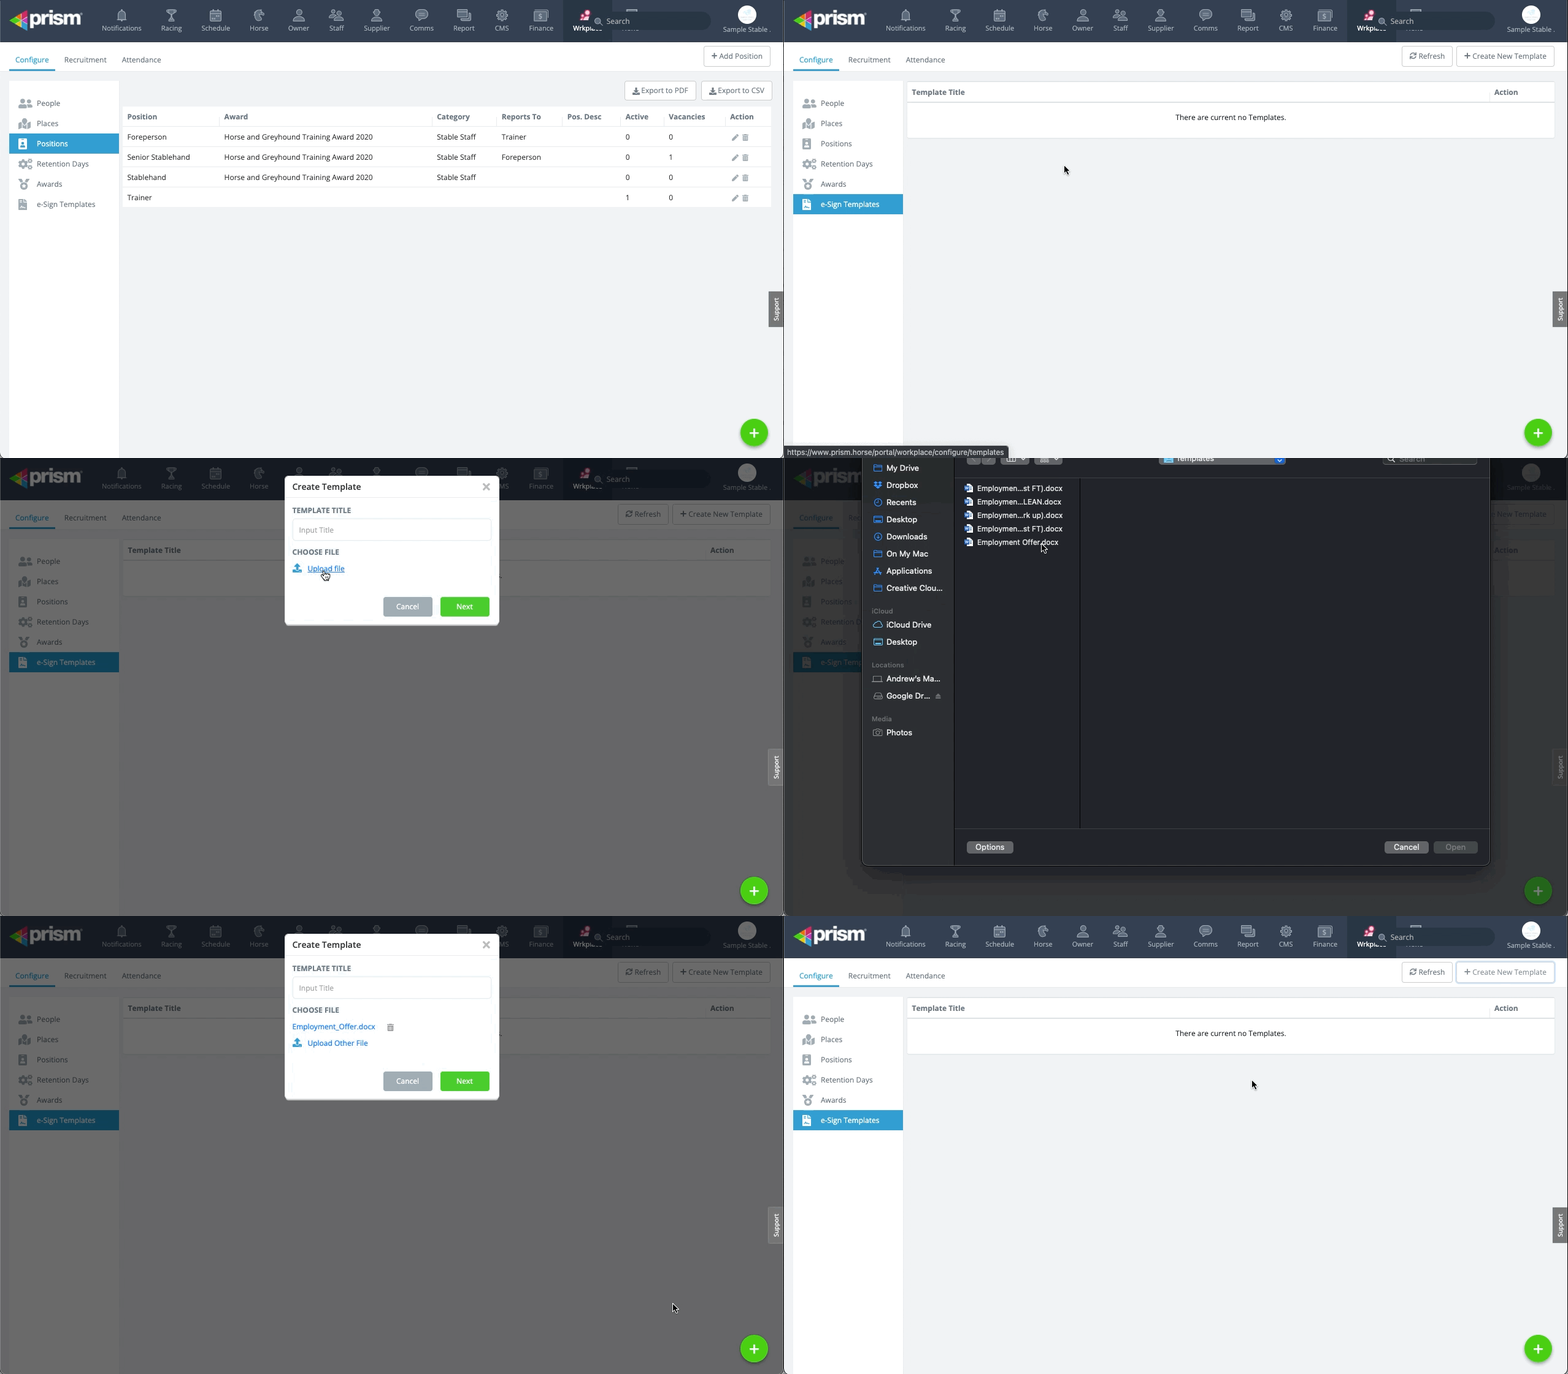
  1. Navigate to Wrkplace > Configure > e-Sign Templates
  2. Click Create New Template
  3. Choose your document to upload (typically a PDF or MS Word document)
  4. Name your Template

Decide who needs to sign and what data needs to be displayed

Continue to configure the data you wish to populate in your template document.

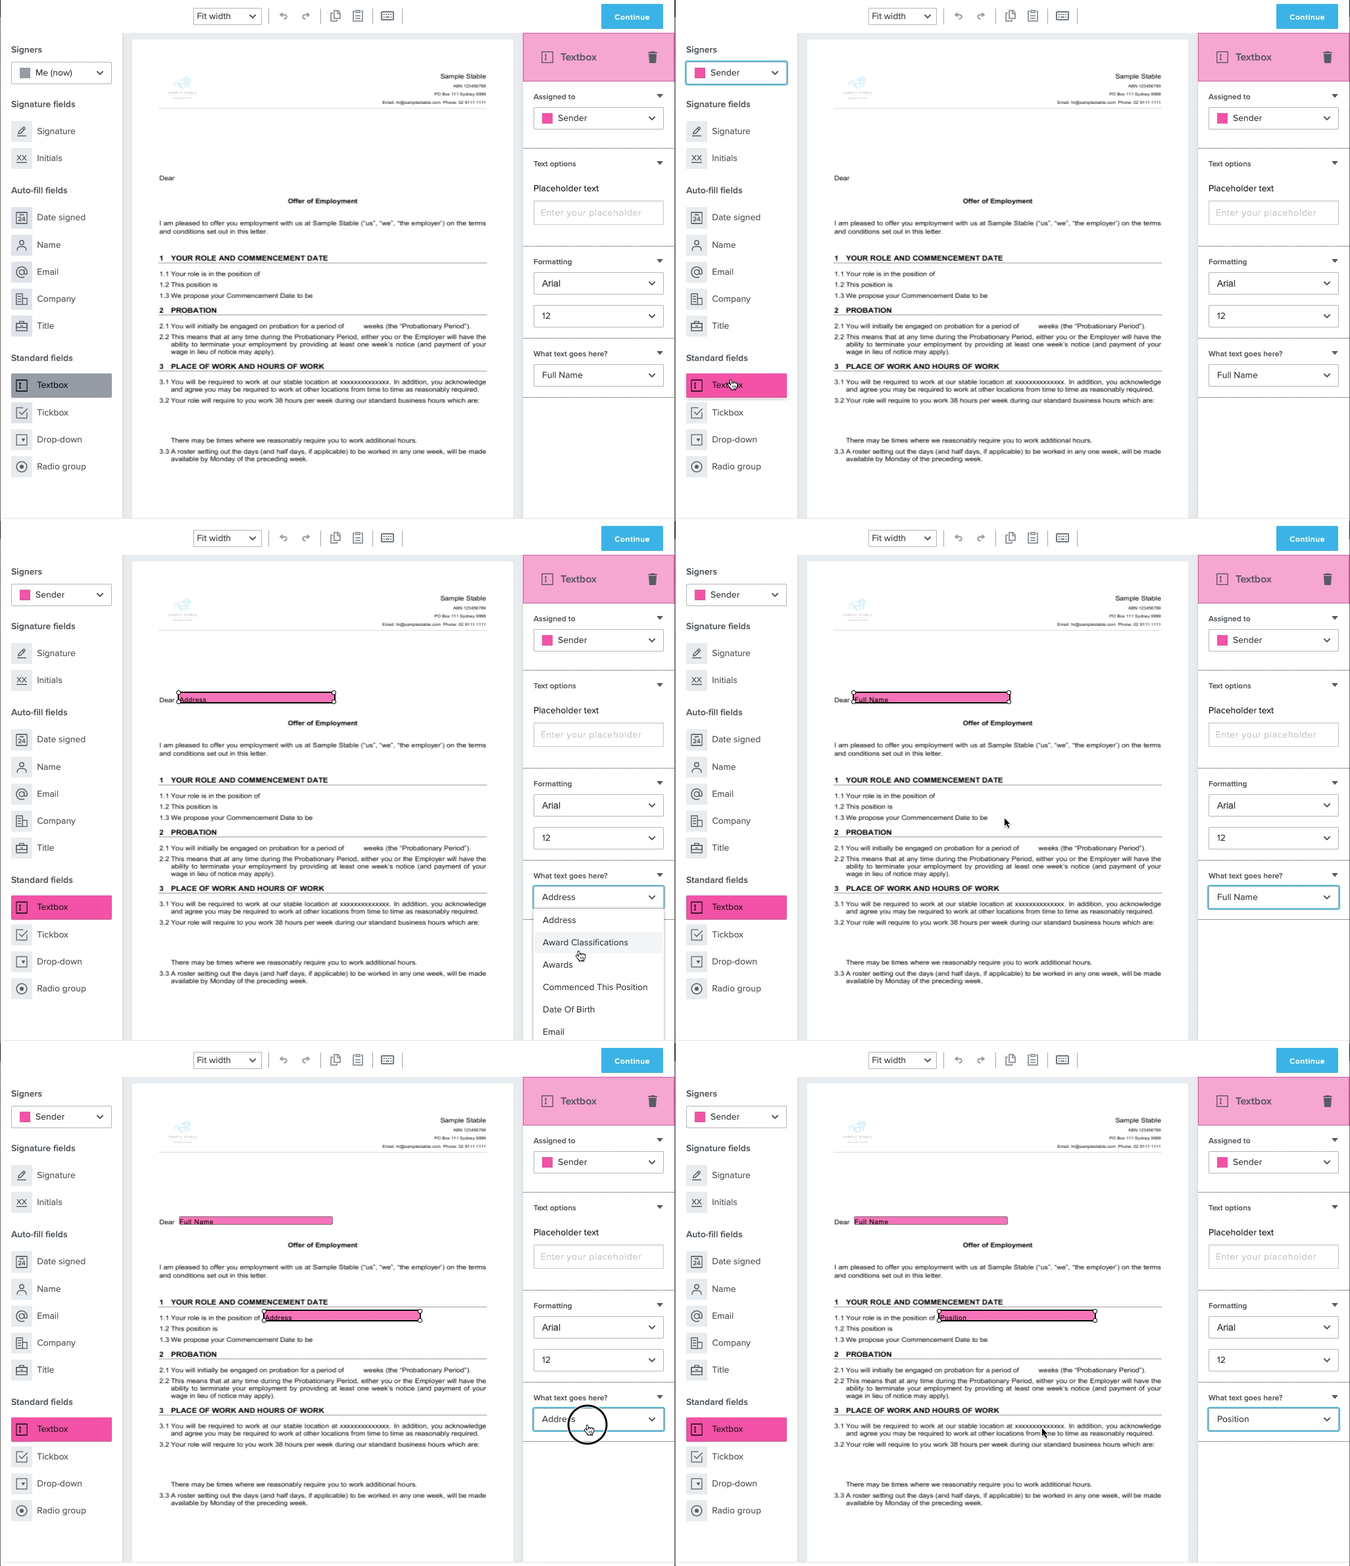
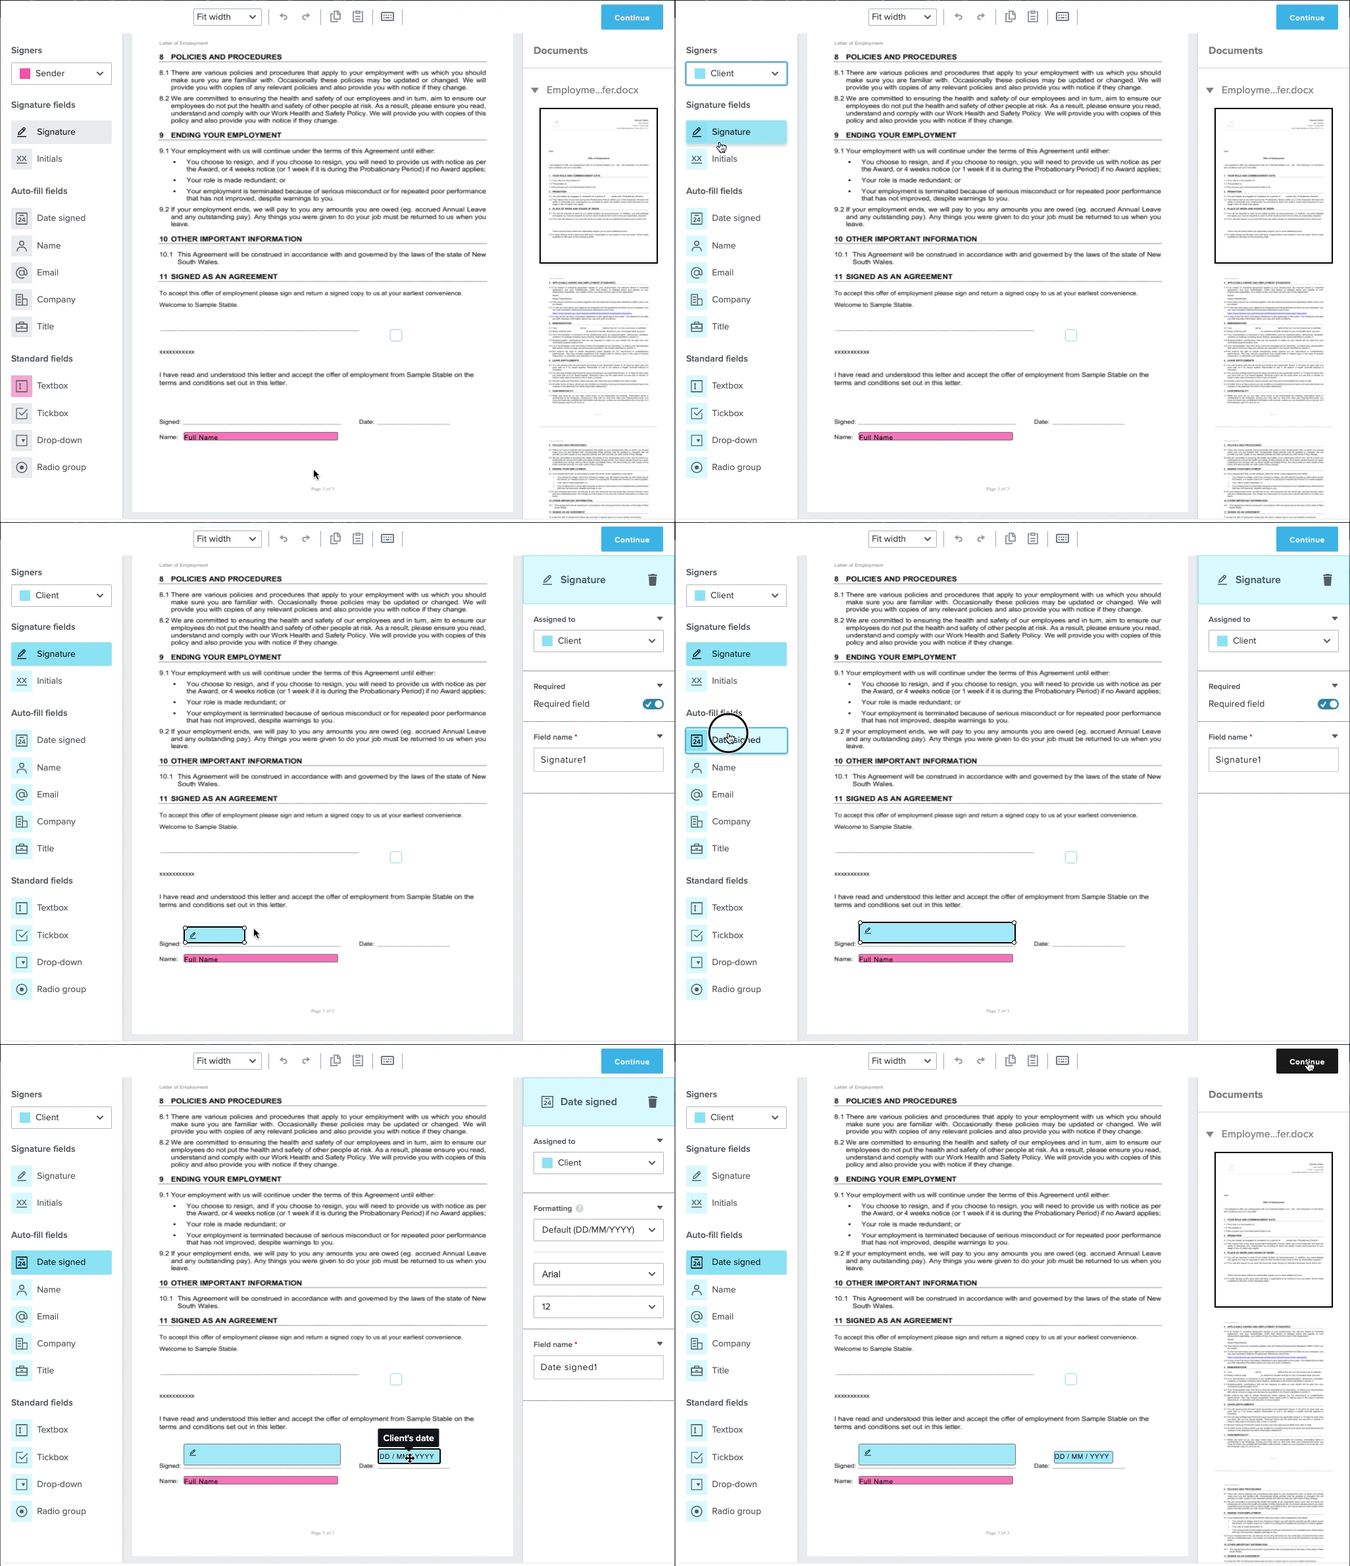
  • Select Sender in the Signers drop-down list to configure the text boxes you (the Sender) wish to populate
  • Drag a Text Box onto your document template, placing the box and re-sizing it to suit your document
  • For each Text Box, specify the data to be displayed from the Employee Record. The data available is from the Personal Information, Employment and Payroll tabs of the Employee record
  • Then select ‘Signer’ (‘Employee’ or ‘Client’) in the Signers drop-down list to configure the signature field or other data field you want the Signer to complete
  • Drag the Signature field into your document template
  • Drag the Date Signed field into your document template
  • Optionally drag a Text Box or Check Box into your document template if you wish the Signer to provide more information when they sign.

Email & SMS applicants and record notes

This article applies to the Wrkplace Recruitment module.

You can email and SMS applicants who have applied for job vacancies posted in Wrkplace, and record notes about those applicants.


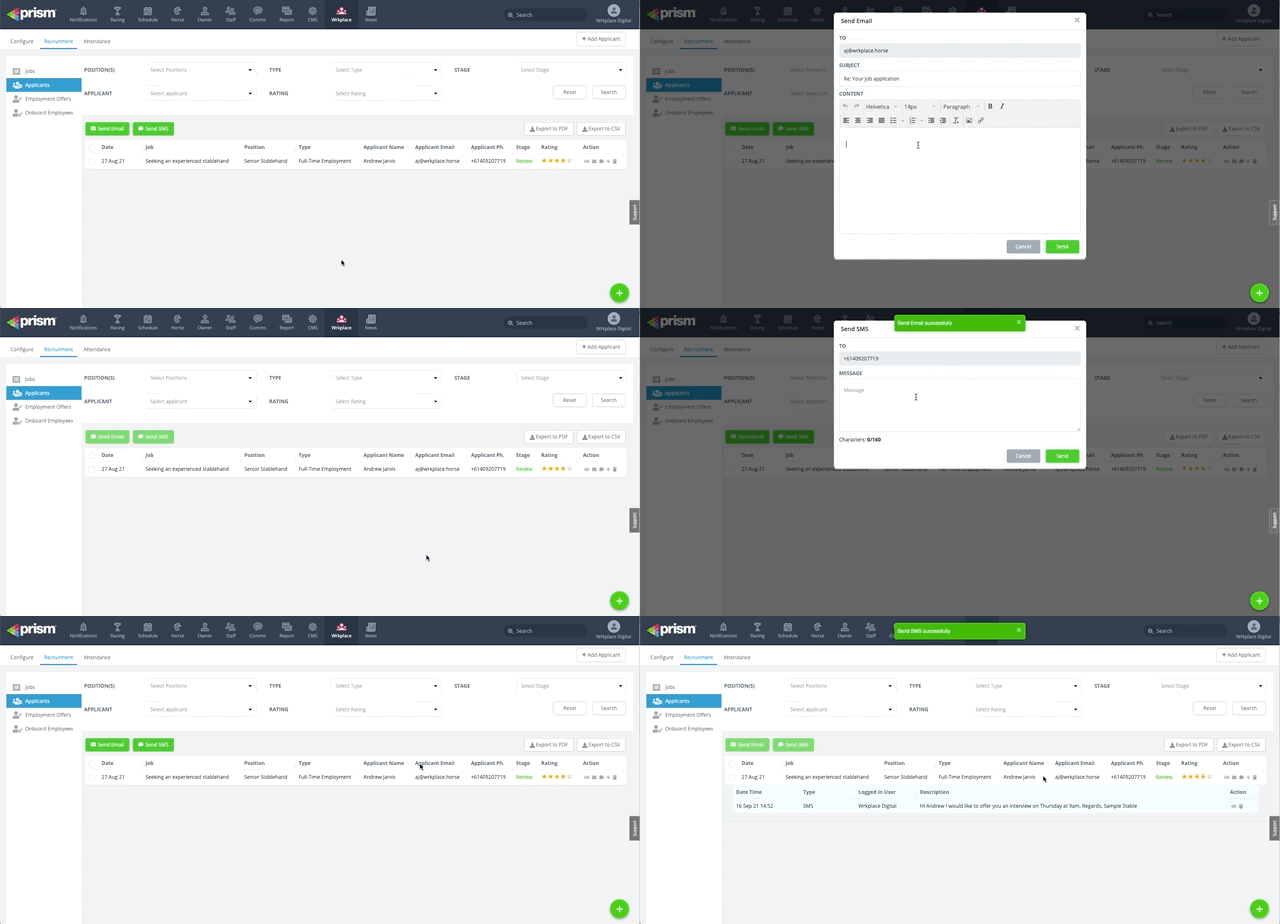
Here’s how to Email or SMS a single applicant, or multiple applicants in batch, any time. 

  • Navigate to Recruitment > Applicants
  • Apply filters if necessary
  • On any Applicant record, click the Email or SMS action icon
  • Or, select multiple Applicant records and click the green Send Email or Send SMS buttons.

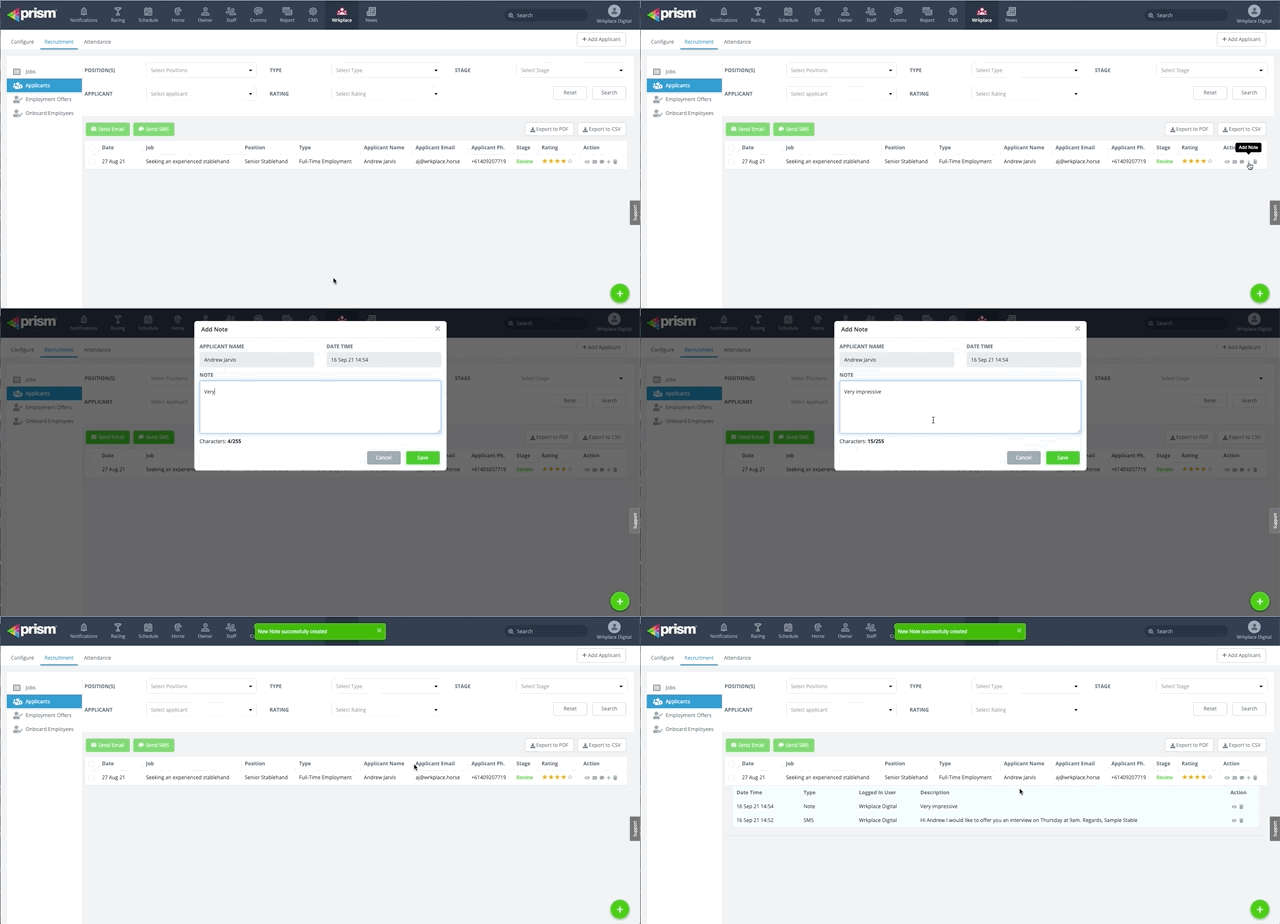
Here’s how to record a Note against a single applicant. 

  • Navigate to Recruitment > Applicants
  • Apply filters if necessary
  • On any Applicant record, click the➕ action icon

In all cases, click anywhere on the Applicant row to view Emails or SMS sent to the applicant, or notes recorded.