Sync contacts between Prism & Keap

If you are a subscriber to leading equine platform Prism, we have fully integrated your Keap App with your Prism portal.

Add new owners from Keap to Prism

Contacts in Keap can be easily added into Prism as new owners, along with all key owner fields (see table at the bottom of this article). This is a typical business process where a contact in Keap becomes an owner for the first time with your business.

Thereafter, a change in one system updates the other within minutes.

To add a contact as an owner in your Prism portal, simply update the Sync With Prism custom field on a Keap contact record to YES. Within minutes, the contact will be added to Prism. No manual entry is required.

You can update the Sync With Prism field to YES manually on a contact, or update many contacts in bulk, or update in an automation sequence after a contact places an order for a share in a horse (preferred). Speak to our implementation consultants about setting up that process.

Add new owners from Prism to Keap

Any new owner added to Prism will be added to Keap within a few minutes.

The contact in Keap will only have the basic contact information assigned (first name, last name, email, phone, date of birth, address).

Periodically sync all owners and horse tags from Prism to Keap

In addition, there is a ‘Sync to Keap’ process in Prism that updates other information on the Keap contact record, such as Nett Ownership Score and Horse Tags (to show which current horses the owner owns).

This process also assigns the ‘Subscribed’ tag to the contact in Keap. This tag is often used to trigger a ‘welcome email’ to new contacts.

We recommend performing this sync often, relative to how often you add owners and horses into your Prism account – weekly during the peak yearling sales season, or perhaps monthly thereafter.

Click on the Prism logo in your Prism portal, then navigate to the CRM dashboard. Click the Sync To Keap button.

Horse Tags applied to Keap contacts

For each active horse that exists in Prism, a corresponding tag will be created in Keap (in the ‘Horse’ tag category).

This horse tag is applied to each of the horse’s owners in Keap to show which horses they own. However, you cannot see what share percentage a contact owns in each horse in Keap.

When a horse is registered (named) the corresponding tag in Keap will automatically update to match the horse name in Prism.

When a horse is archived in Prism, the corresponding tag in Keap will be deleted.

What data is synchronised between Prism and Keap?

The following data is constantly and immediately kept in sync between Prism and Keap.

As soon as any data changes in one system, the owner/contact data will update in the other system within minutes.

You can also choose 6 custom fields on contact records in Keap, to sync to Prism owner profiles (in addition to the standard contact details fields). This is very useful to be able to view the most important contact data in your Prism desktop or mobile app.

Prism Owner ProfileSync directionKeap Contact Record
Primary (first) Email Address
Additional email addresses not synced*
< >Email 1 (defaults to Email Work)
Additional email addresses not synced *
First Name, Last Name< >First Name, Last Name
Phone Number< >Phone 1
Address, Suburb, State, Postcode, Country< >Billing Address 1, Billing City, Billing State, Billing Postcode, Billing Country
Account Manager< >Owner (Keap User assigned as the ‘owner’ of each contact – rarely used)
Spouse< >Spouse
Date of Birth< >Date of Birth
> Contact Type
Active owners of active horses set to ‘CLIENT’ during nightly automation
Ranking (Platinum, Gold, Silver, Bronze)< >Ranking (Platinum, Gold, Silver, Bronze)
Nett Ownership Score>Nett Ownership Score
This is only updated when the ‘Sync to Keap’ process is run in Prism.
Owner User ID< >Owner User ID
Horses Owned>Horse tags applied
This is only updated when the ‘Sync to Keap’ process is run in Prism.
6 additional custom fields of your choosing< >5 additional custom fields of your choosing.
Speak to our consultants who can setup the two-way sync of
5 additional custom fields between Keap and Prism.
These fields will appear on Prism owner profile (desktop & mobile app)

* Note that additional email addresses on an owner profile in Keap are NOT sync’d to Keap, and vice versa. Keap Emails are not sent to additional email addresses, so we do not pass additional emails to Keap contact records. We recommend additional email addresses be added into Prism as separate Owners in Prism, which are therefore synchronised with Keap contacts.

Important notice regarding removing owners from Prism

Currently, if you remove an owner profile from your Prism Portal there is a risk that the contact is added back into Prism during the next ‘Sync to Keap’ process.

The integration from Prism does not remove the contact from Keap and nor should it. If you remove an owner from Prism, also edit the Keap contact and set the ‘Sync With Prism’ custom field to NO.


Contact records

Like any good Customer Relationship Management (CRM) solution, Keap provides many options to store your contacts’ information.

Our training should provide you all the necessary skills, but here are links to some helpful articles on Keap’s help site.


Add or edit a contact record

Adding and editing contact records are a breeze. Learn how.

Filter contacts and manage contact groups

You can filter your contacts based on specific criteria or create a Contact Group with that specific criteria, which will allow you to quickly take action. Learn more.

Contact record and activity feed

The contact record provides key information about your contacts and includes action buttons so you can easily send emails, send messages, apply tags and much more. Learn more.

Manage contacts on Keap Mobile

When mobile, you can use the Keap Mobile App for iOS or Androis. Just search for Keap in the Apple Store or Google Play Store and manage your contacts in a similar way to how you manage them on the web. Learn about Keap Mobile.

However, we recommend accessing Keap via your browser (Google Chrome recommended). On your mobile, bookmark the same login page you use to login via the web. On mobile, the user interface is consistent with Keap on your desktop browser. Access Keap via your mobile browser.

Enable emails to be sent to employees and job applicants

There is an important action that is needed to ensure reliability of outbound emails to your employees and job applicants, from your email address(es).

Records need to be added to your domain so Wrkplace (and email service Postmark) can reliably send emails from any email address on your domain.

We will email you instructions upon signing up to Wrkplace. We can also help you or your IT team with this process.

Specifically, these instructions will show you how to add DKIM and Return Path records to your domain name settings (DNS). A bit technical, but with our help, it’s not a big job.

If you are already a Prism subscriber, these records are likely to be already added to your DNS. In this case we will not email you instructions. Our onboarding team will check everything upon your Wrkplace account being enabled.

Send documents to employees for e-signature

Wrkplace HR allows employers to setup any number of document templates and email new or existing employees for electronic completion and signature. 

This article details how to:

  • Offer a position to your preferred candidate; and
  • Send a document template for electronic signature at any time.

Please review how to create document templates for electronic signature before reading this article.


Offer a position to your preferred candidate

When reviewing applicants, change the Applicant’s stage to OFFER.

You can then automatically add the applicant as a new employee into Wrkplace HR. This saves you manually adding details.

Proceed to add other details into the employee record, including all employment and payroll details.

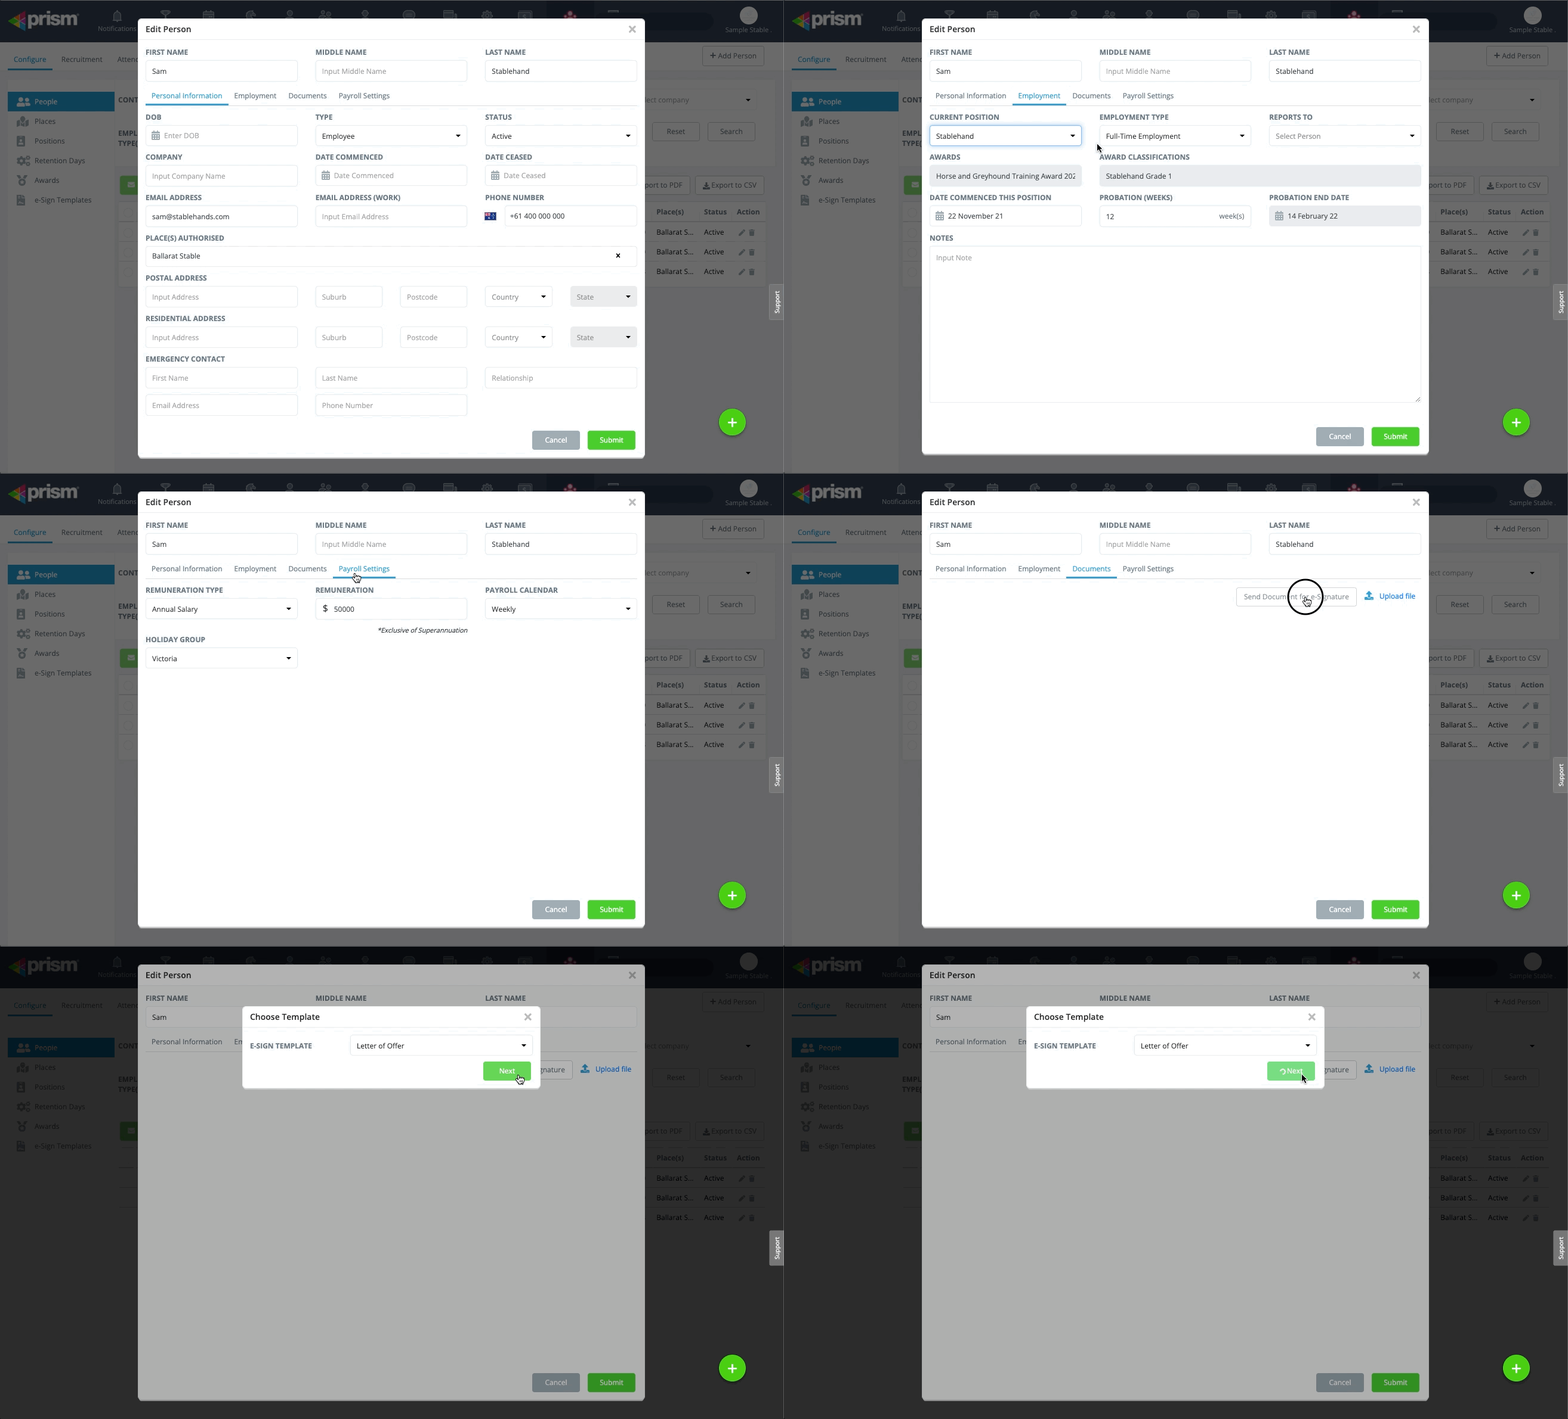
Then, in the Documents tab, send a document for eSignature and select your preferred document template. For example, you may have three Letter of Offer templates – Full Time, Part Time and Casual Employees – each with the specific terms of employment that apply.

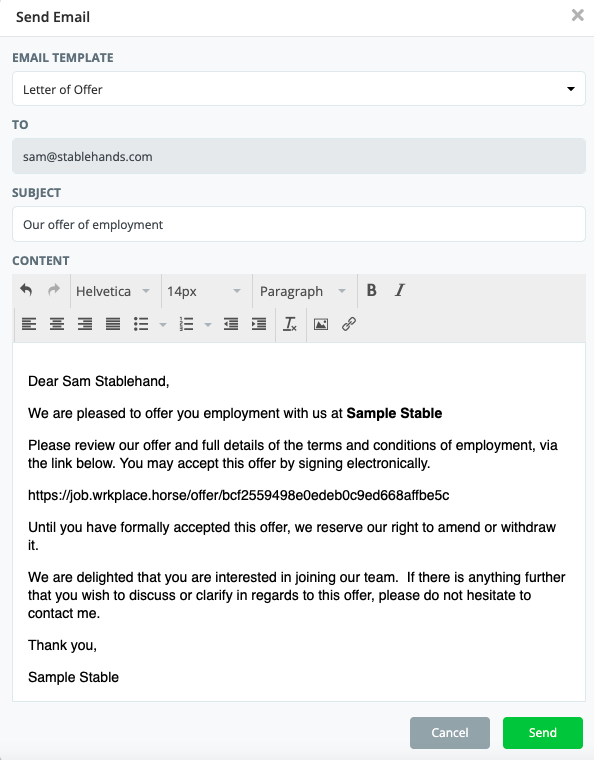
An email window will open displaying a “letter of employment offer” email template. You can edit any of the text, but ensure you do not edit or move the URL of the document. This URL provides your employee with an easy way to click and sign.

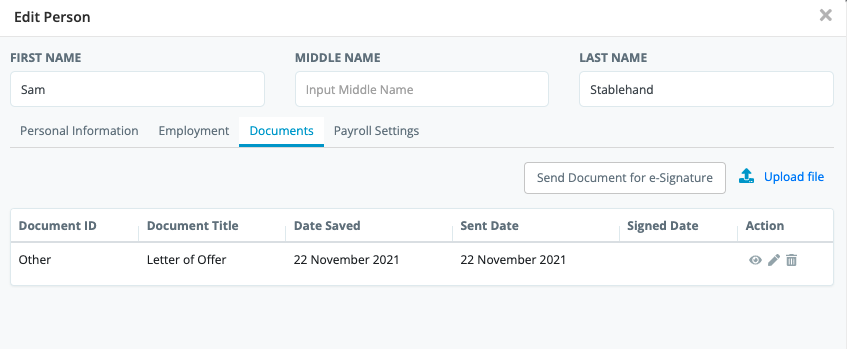
Upon sending, you will see the document added to the Documents tab in the Employee record, along with the date the document was sent.

Upon the employee signing the document:

  • you will be emailed a PDF version of the signed document;
  • the signed document will be saved and viewable in the Documents tab
  • the Signed Date will be updated

Send Document for e-signature at any time

At any time you can populate any of your templates with data from an employee record and send for e-signature.

This is perfect for sending a new employee form / Tax File Declaration Form / Superannuation Choice form to new staff members who have accepted employment. Or perhaps you have a health questionnaire to send, or specific workplace policies.

  • Navigate to Wrkplace > Configure > People
  • Select the Employee
  • Review Personal Information, Employment and Payroll information, and update where necessary. Some or all of this data may be configured to display in your templates
  • Navigate to the Documents tab
  • Click Send Document for e-Signature button
  • Select the Document Template

An email window will open. You can choose from two email templates:

  • a “letter of employment offer” template; or
  • a blank email template

After selecting your preferred email template, modify the email content if you desire.

Ensure you do not edit or move the URL of the document. This URL provides your employee with an easy way to click and sign.

Create document templates for electronic signature

Wrkplace HR allows employers to setup any number of document templates and then automatically pre-fill employee and job details and email to new or existing employees for electronic completion and signature – in seconds.

Adding new document templates and configuring them for electronic signature, is a breeze. Wrkplace integrates with renowned e-signature solution Dropbox Sign for the most flexible and easiest template creation experience.

Sending an employment offer to your preferred candidate. Send an employee details form to a new hire after they accept the role. Send workplace policies to new or existing employees.

Wrkplace HR can save you and your employees hours of administration.

No more paper. No manual emails. Hire staff before your competitors.

This article details the two steps to setup document templates:

  1. Upload document
  2. Decide who needs to sign and what data needs to be displayed

Upload Document

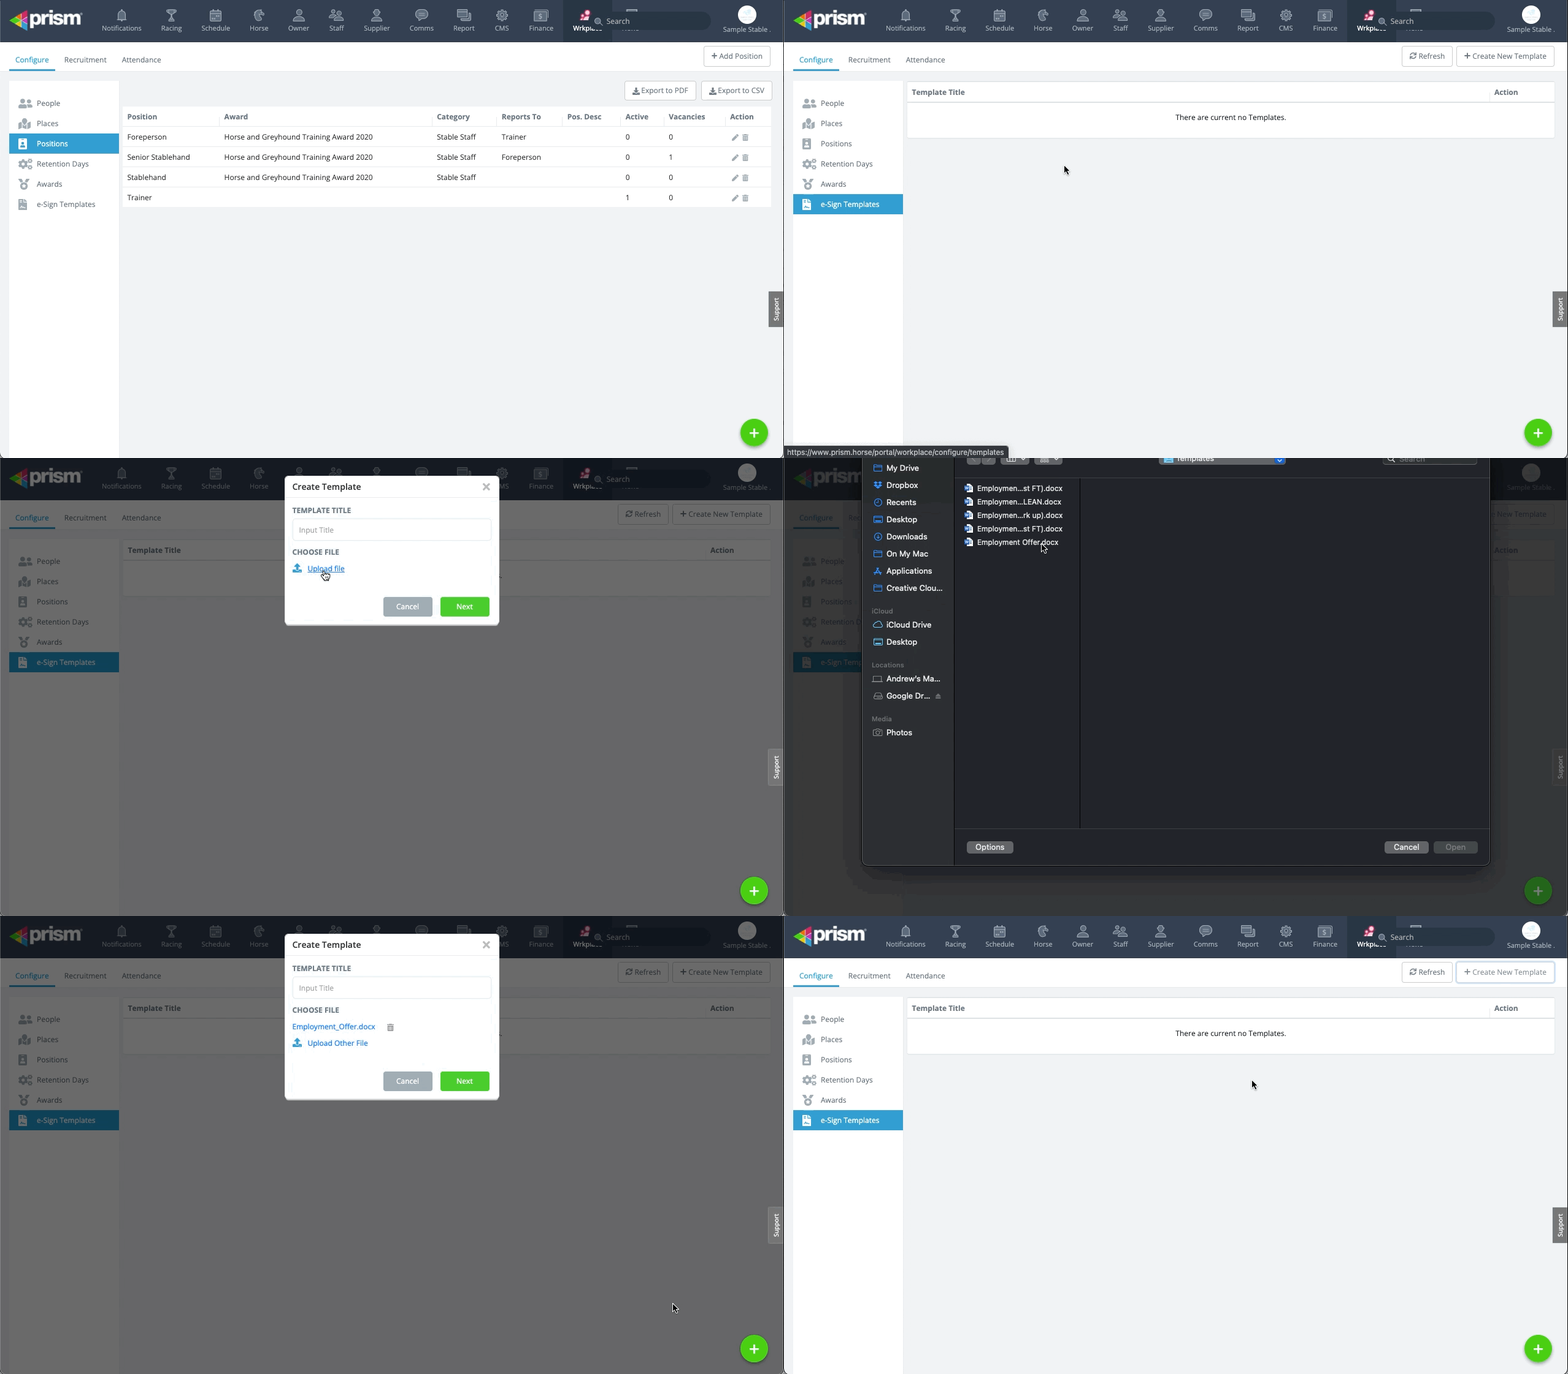
  1. Navigate to Wrkplace > Configure > e-Sign Templates
  2. Click Create New Template
  3. Choose your document to upload (typically a PDF or MS Word document)
  4. Name your Template

Decide who needs to sign and what data needs to be displayed

Continue to configure the data you wish to populate in your template document.

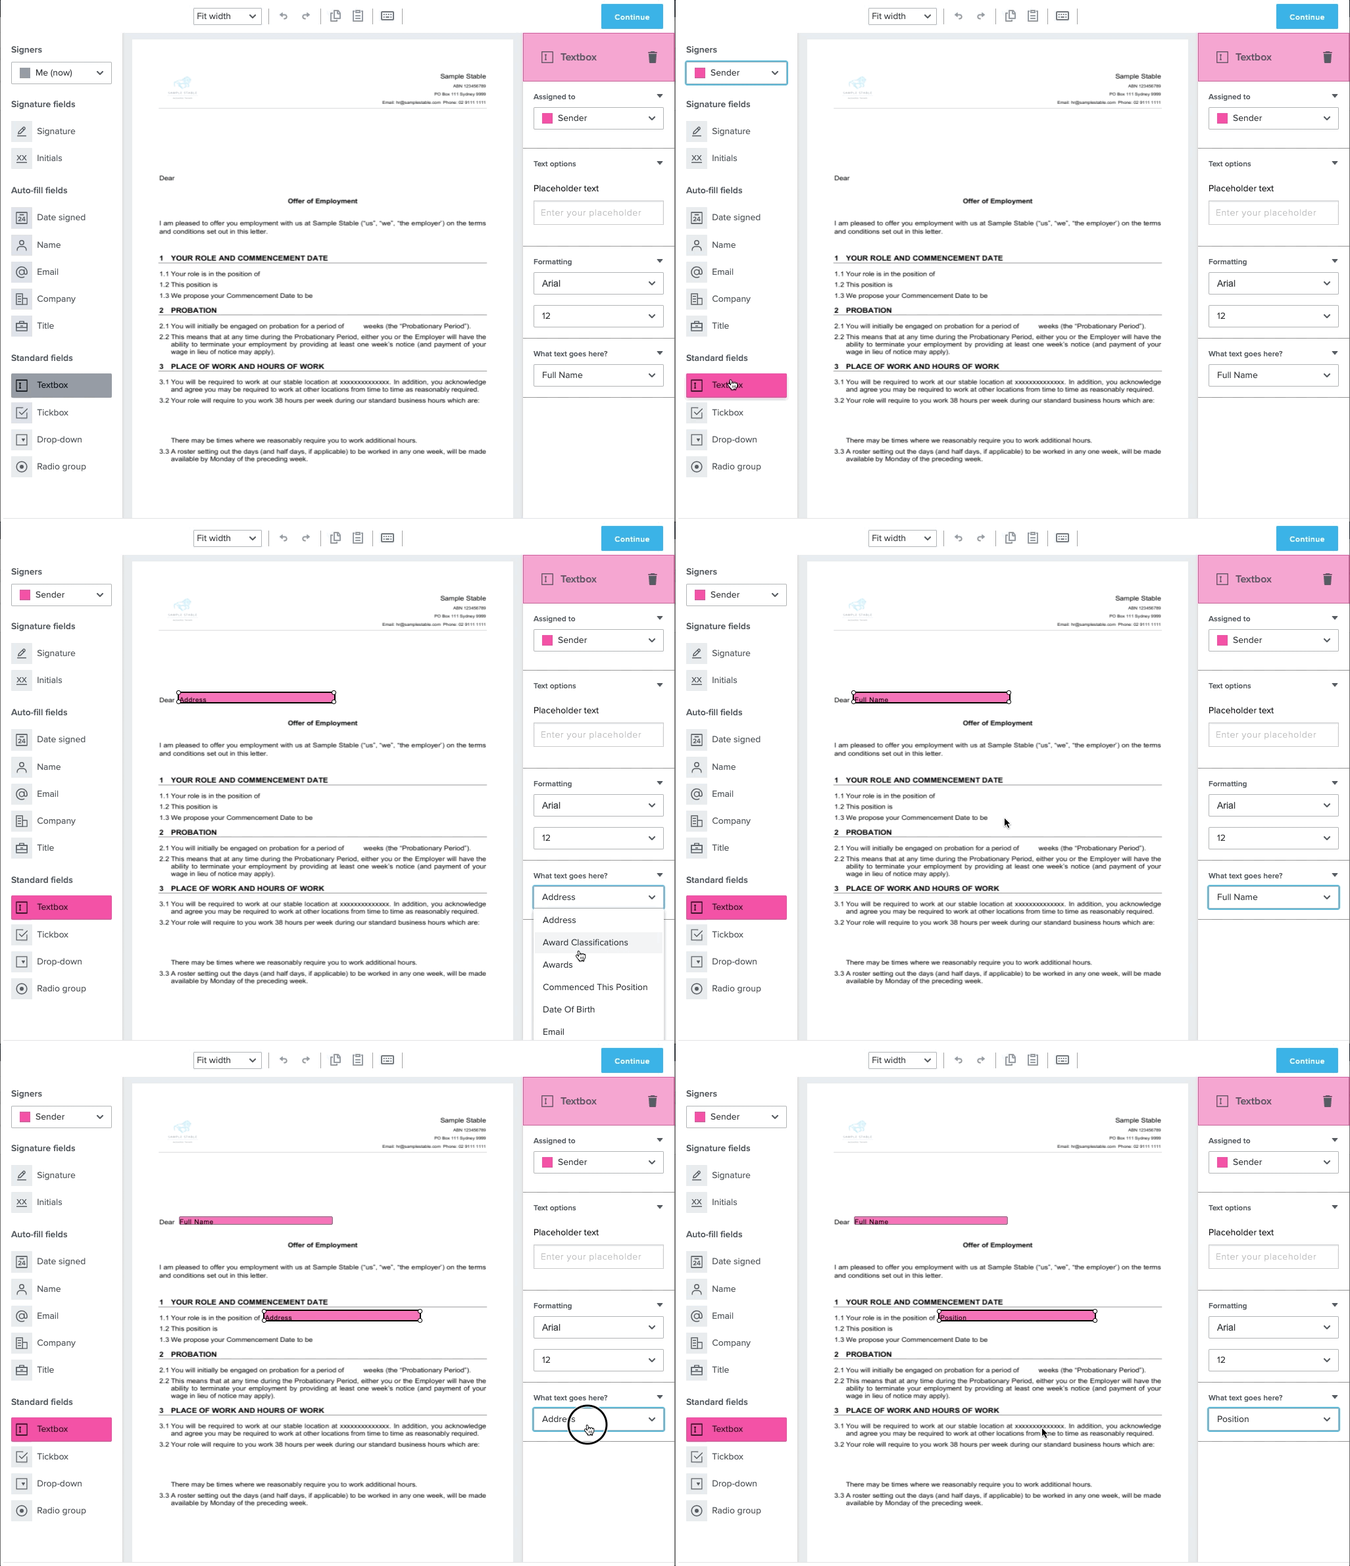
  • Select Sender in the Signers drop-down list to configure the text boxes you (the Sender) wish to populate
  • Drag a Text Box onto your document template, placing the box and re-sizing it to suit your document
  • For each Text Box, specify the data to be displayed from the Employee Record. The data available is from the Personal Information, Employment and Payroll tabs of the Employee record
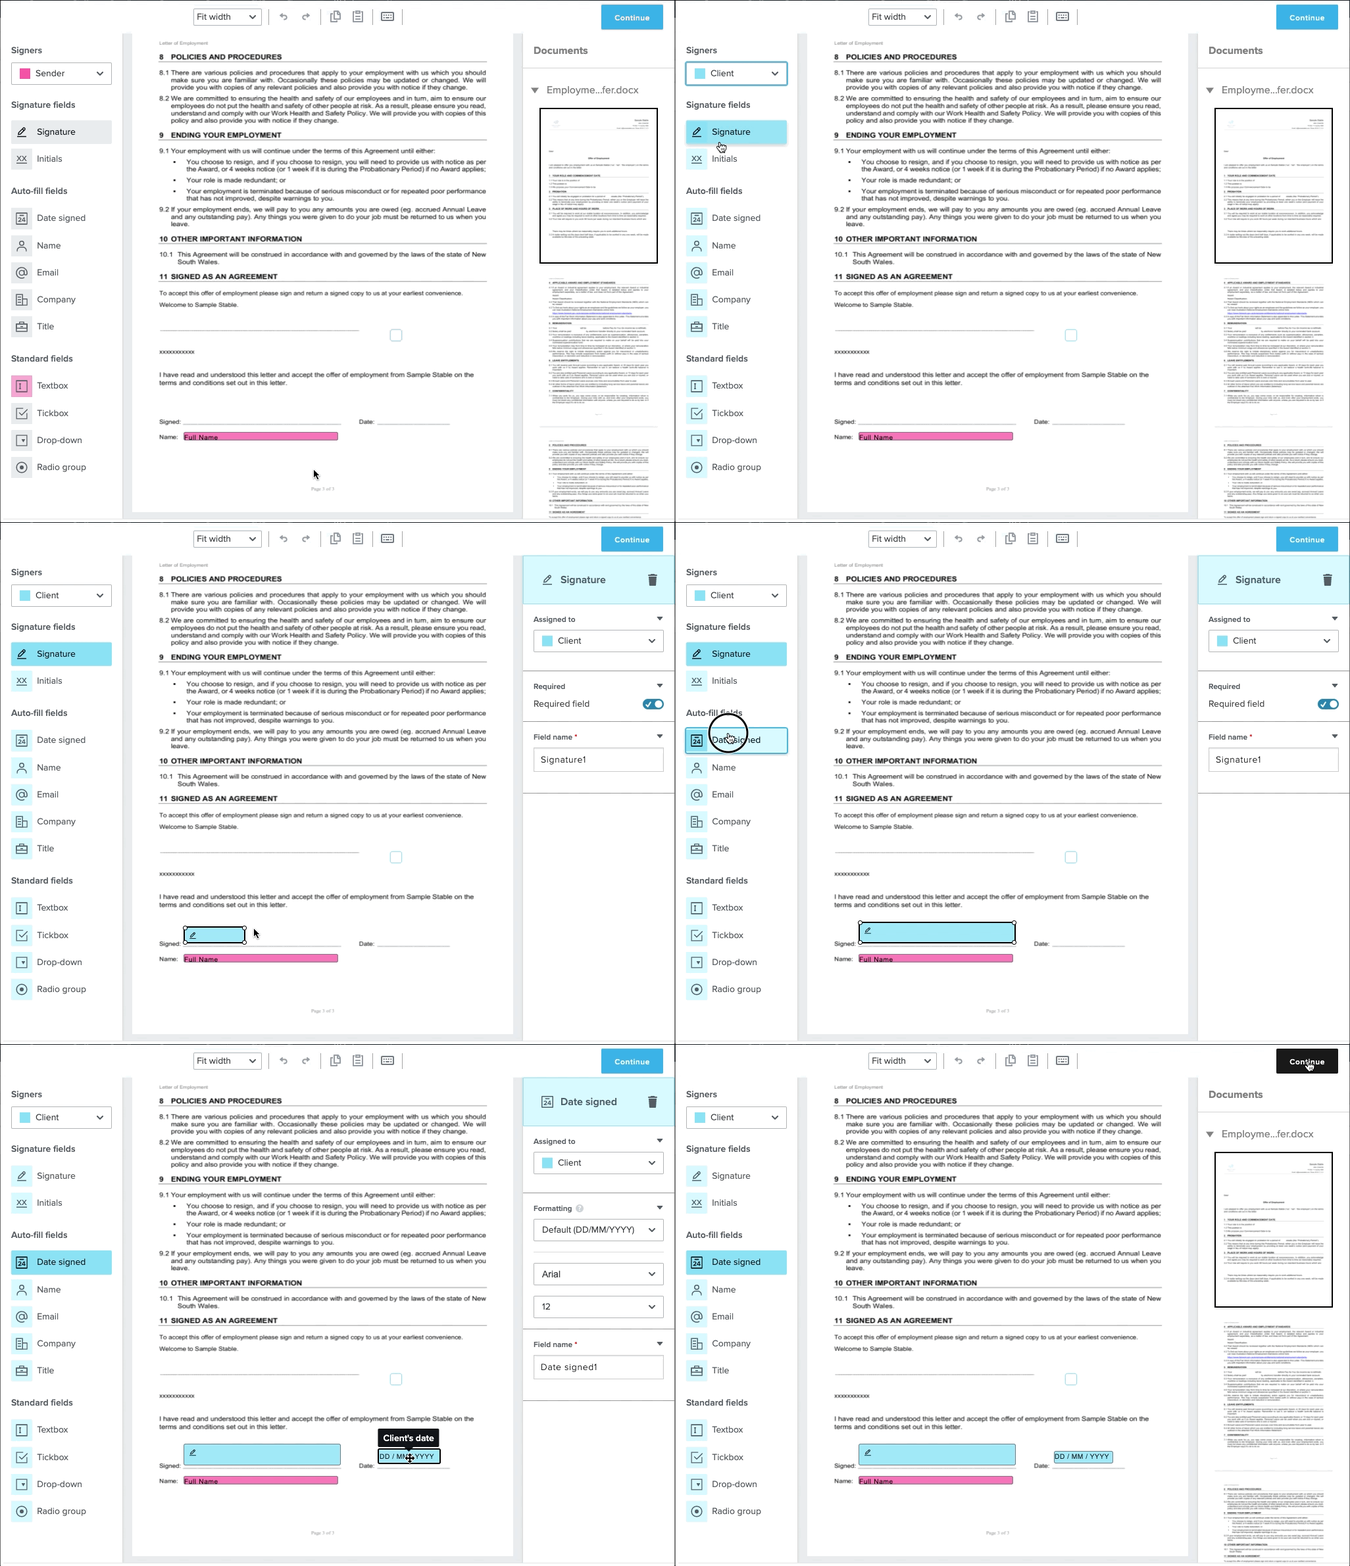
  • Then select ‘Signer’ (‘Employee’ or ‘Client’) in the Signers drop-down list to configure the signature field or other data field you want the Signer to complete
  • Drag the Signature field into your document template
  • Drag the Date Signed field into your document template
  • Optionally drag a Text Box or Check Box into your document template if you wish the Signer to provide more information when they sign.