Configure Health Screening

This article applies to the Wrkplace Attendance module.

Wrkplace Attendance’s health screening feature allows you to ask one or more questions of each attendee upon signing in to your workplace, and requires your attendees to answer either YES or NO.

Your attendees’ answer to each question will determine whether they are authorised to enter your workplace or not.

These health screening questions can apply to one, multiple or all attendee types (Employees, Contractors, Visitors, Event Attendees or Delivery Drivers). This allows you to ask specific questions, or not ask specific questions, of certain attendees.

You must have at least one Health Screening question configured.


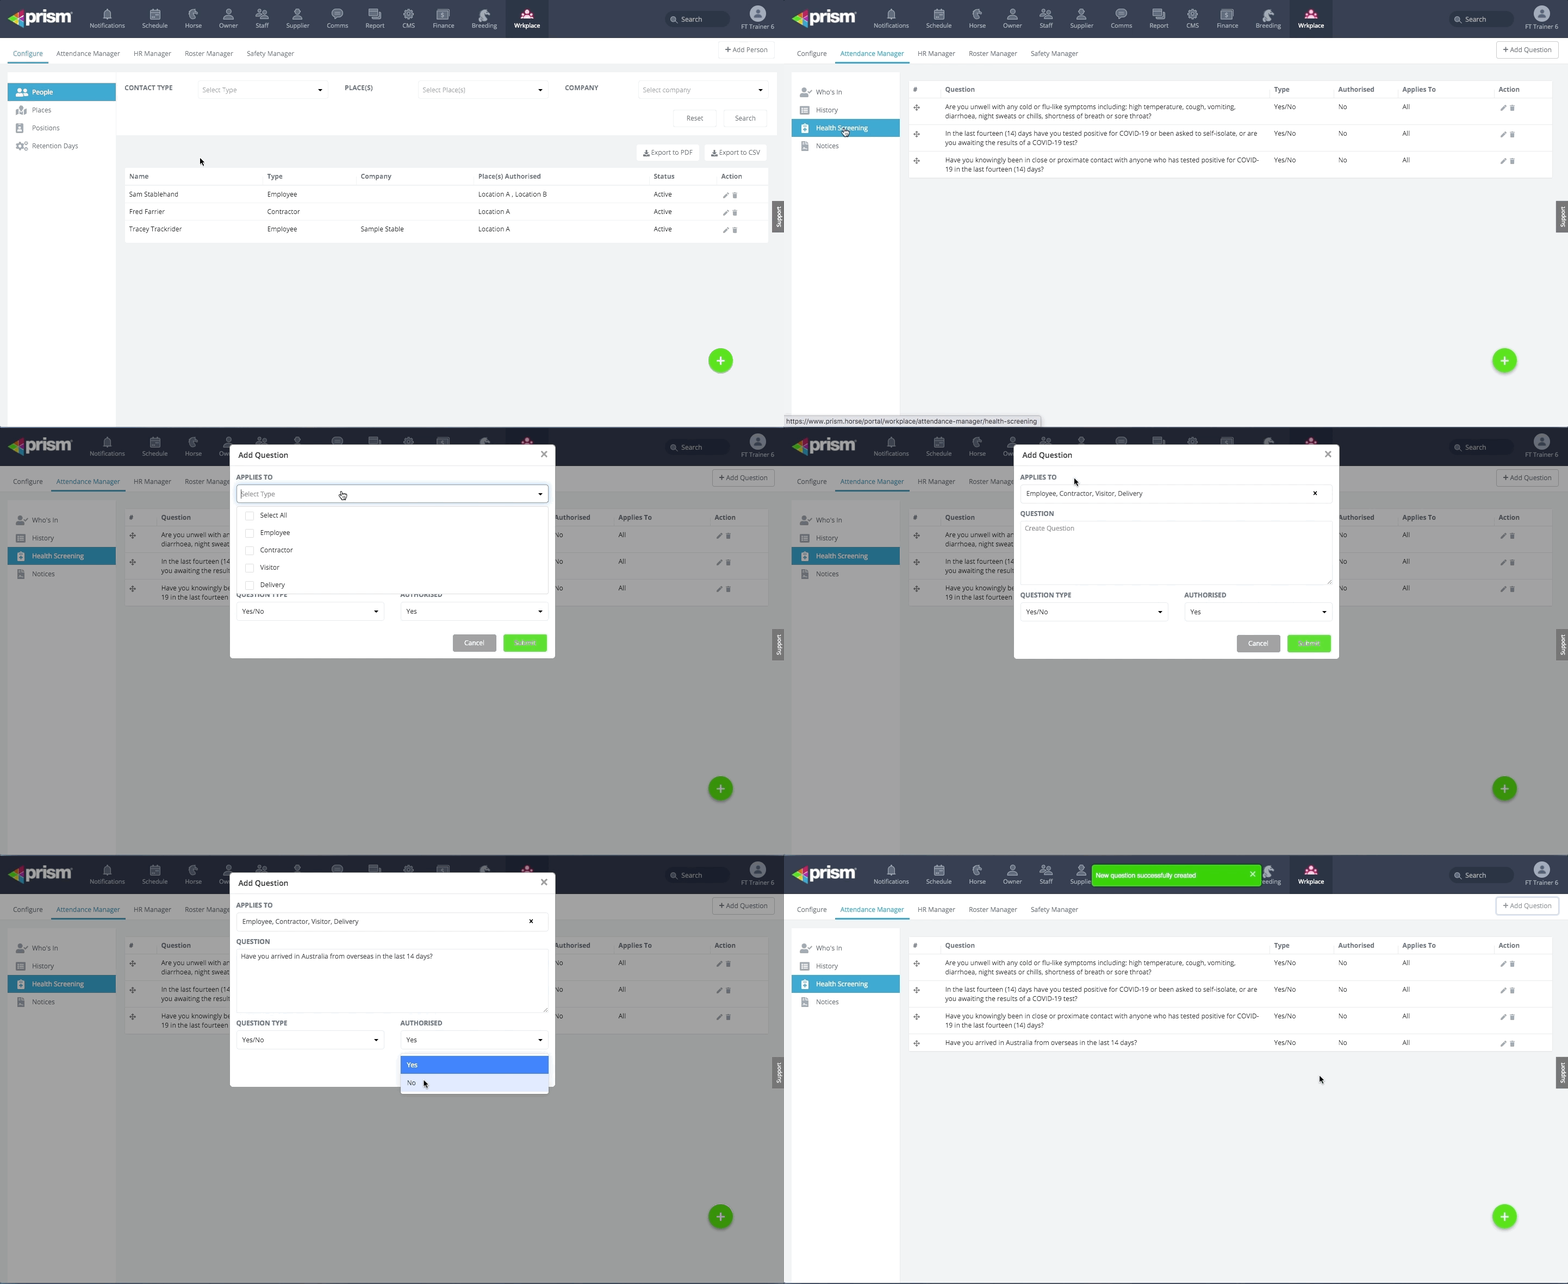
Here is how to configure your health screening questions.

Navigate to Attendance Manager > Health Screening

  • Select Add Question
  • Select which attendee type(s) this question applies to
  • Type in your question (we recommend no greater than two lines)
  • Specify which answer (Yes/No) will authorise your attendee’s entry into your workplace

You can add, edit or delete any health question to ask attendees upon signing in.
Configure Retention Days

This article applies to the Wrkplace Attendance module.

Wrkplace Attendance Manager will keep an Attendance History log.

You can configure the solution to automatically delete attendance history after a specified number of days for employees, contractors, visitors and deliveries.

This is an important configuration step as your country and state will have specific COVID Safe requirements to keep attendance history for a specified number of days, but privacy regulations that require the deletion of that data after the specific number of day.

For example, in Victoria and New South Wales, you are compelled to store attendance history for 28 days, but no longer (unless the data relates to an employee). In Queensland, the number of days is 56.


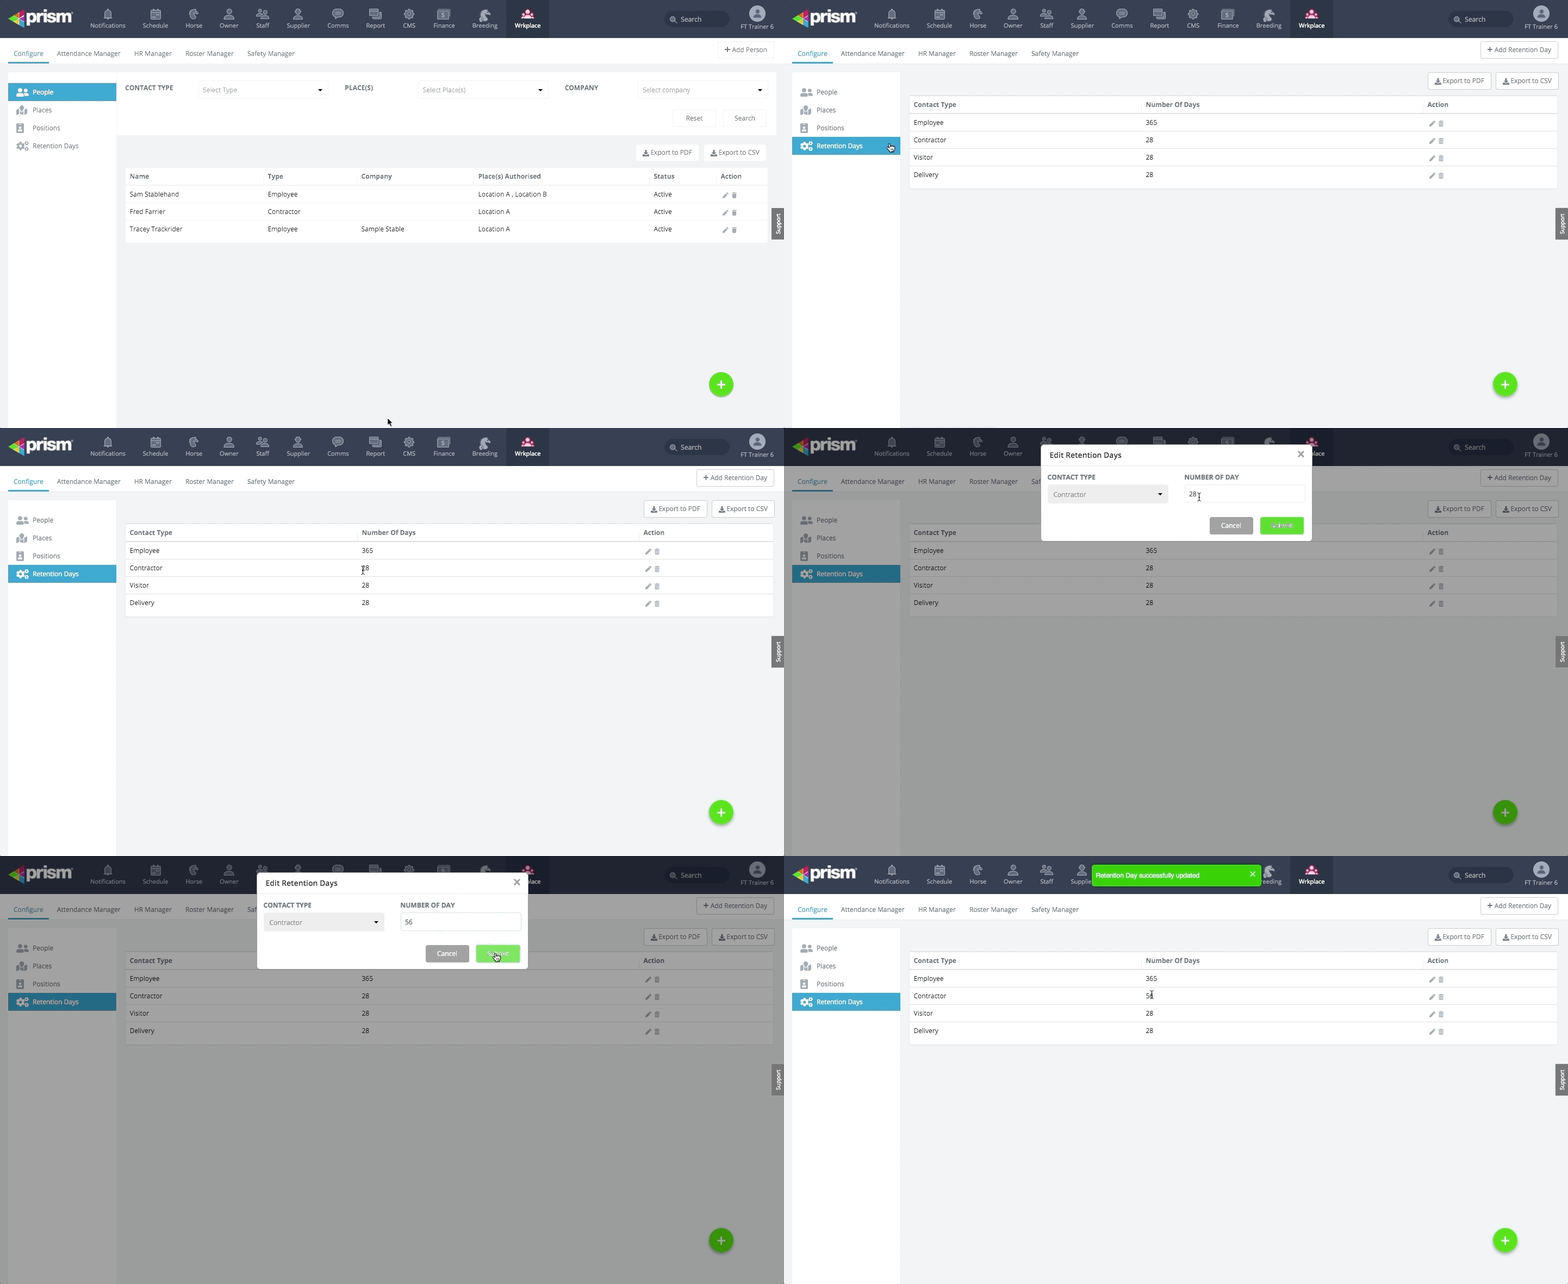
Here is how to configure the number of days attendance data is retained in your Wrkplace Attendance database.

  • Navigate to Configure > Retention Days
  • Edit the number of days to retain attendance history for each attendee type.

Note: If you are using Wrkplace to track employee time in & out for payroll, ensure you maintain the required amount of time sheet data to satisfy applicable country regulations (e.g. in Australia, this is seven years).

Add Awards

Before adding Positions and your Employees who fill those Positions, you may need to add in any applicable Awards and Award Classifications.

These Awards and Award Classifications can then be assigned to the Positions in your organisation. This helps you manage your HR processes including employee pay and entitlements, and correctly onboarding new employees.


Here is how to add Awards and Award Classifications.

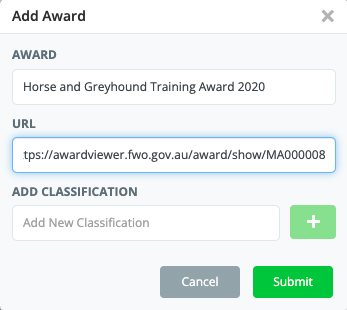
  • Navigate to Configure > Awards, then select click Add Award.
  • Enter Award Name
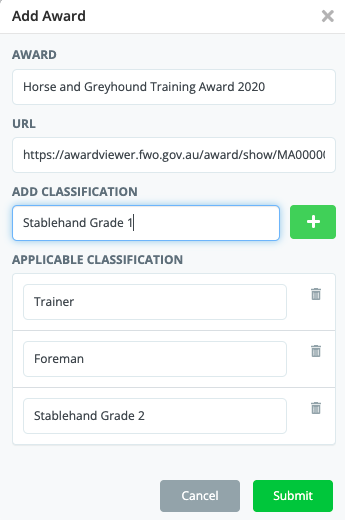
  • Enter the URL of the Award (we recommend pasting the URL of the award to ensure you are always linking to the most up to date version of the Award, and to allow the URL to be easily shared with employees and candidates)
  • Enter all relevant Award Classifications

Add Positions

Pre-requisites

Positions are the ‘roles’ your employees are employed to perform.

When adding your employees into the People records (see How to add People), you assign each employee to a Position.

So before adding employees into the People records, add all the relevant Positions.

You must first add any relevant Awards and Award Classifications. You can then assign any relevant Award and Award Classification to each Position as you add Positions.


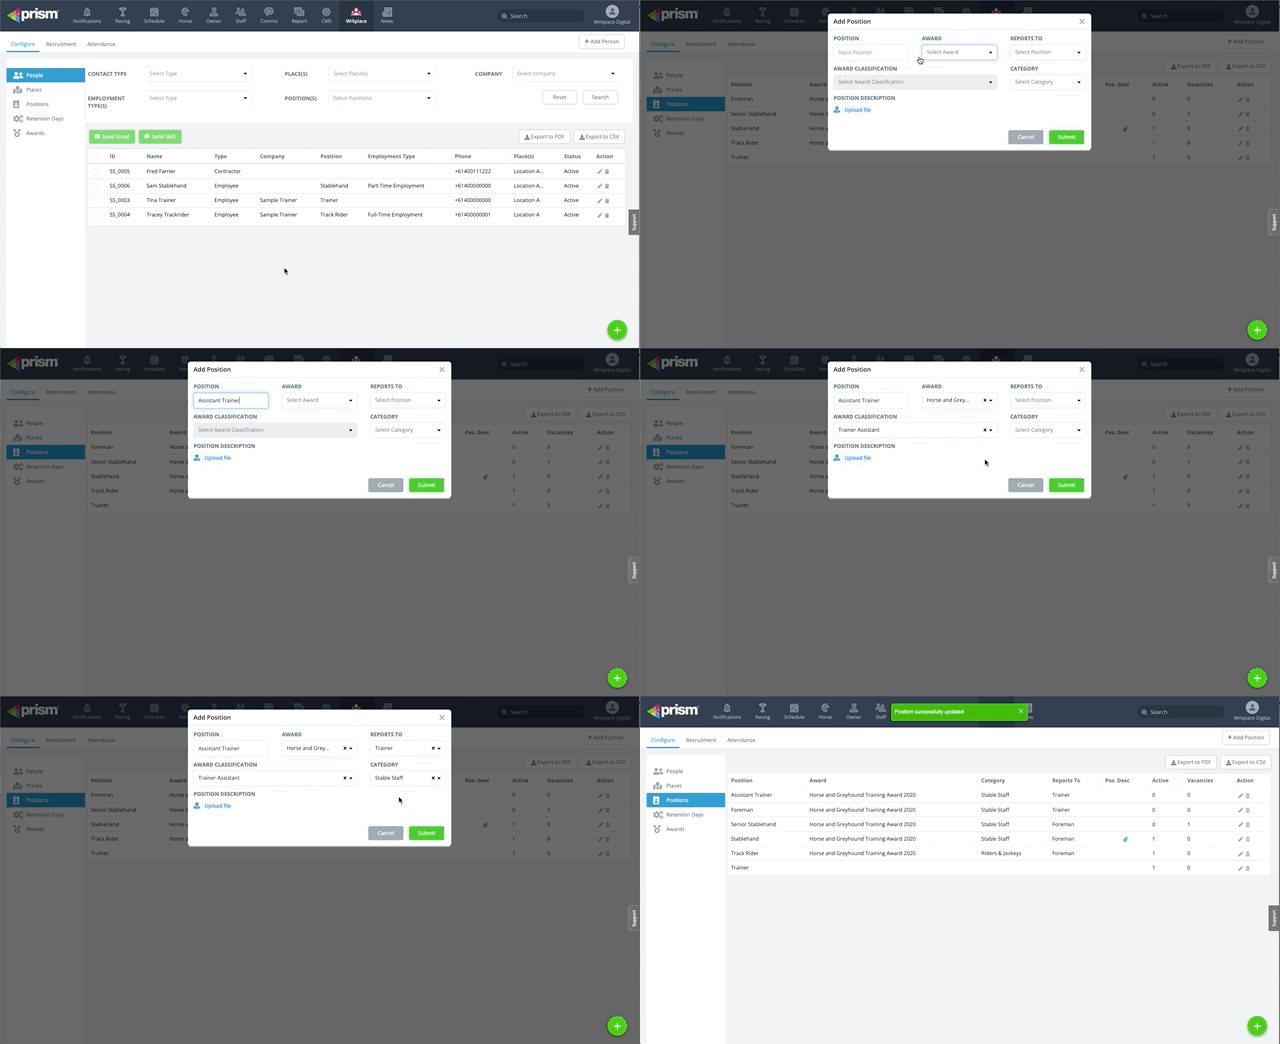
Here is how to add Positions.

  • Navigate to Configure > Positions, then select click Add Position.
  • Enter Position
  • Select Award and Award Classification (optional, but recommended)
  • Select which other position this position Reports To (optional, but recommended)
  • Select a job Category

Add People

Pre-requisites


All Employees and Contractors are added into the People table.

If you are using the Wrkplace Attendance, adding employees and contractors into the People table streamlines the sign-in process. You can also record more information about each employee and contractor, not just their email and phone number.

If you are using the Wrkplace Recruitment module, record all relevant employment details of each employee. This includes employment and payroll data and the ability to upload documents.


Here is how to add People.

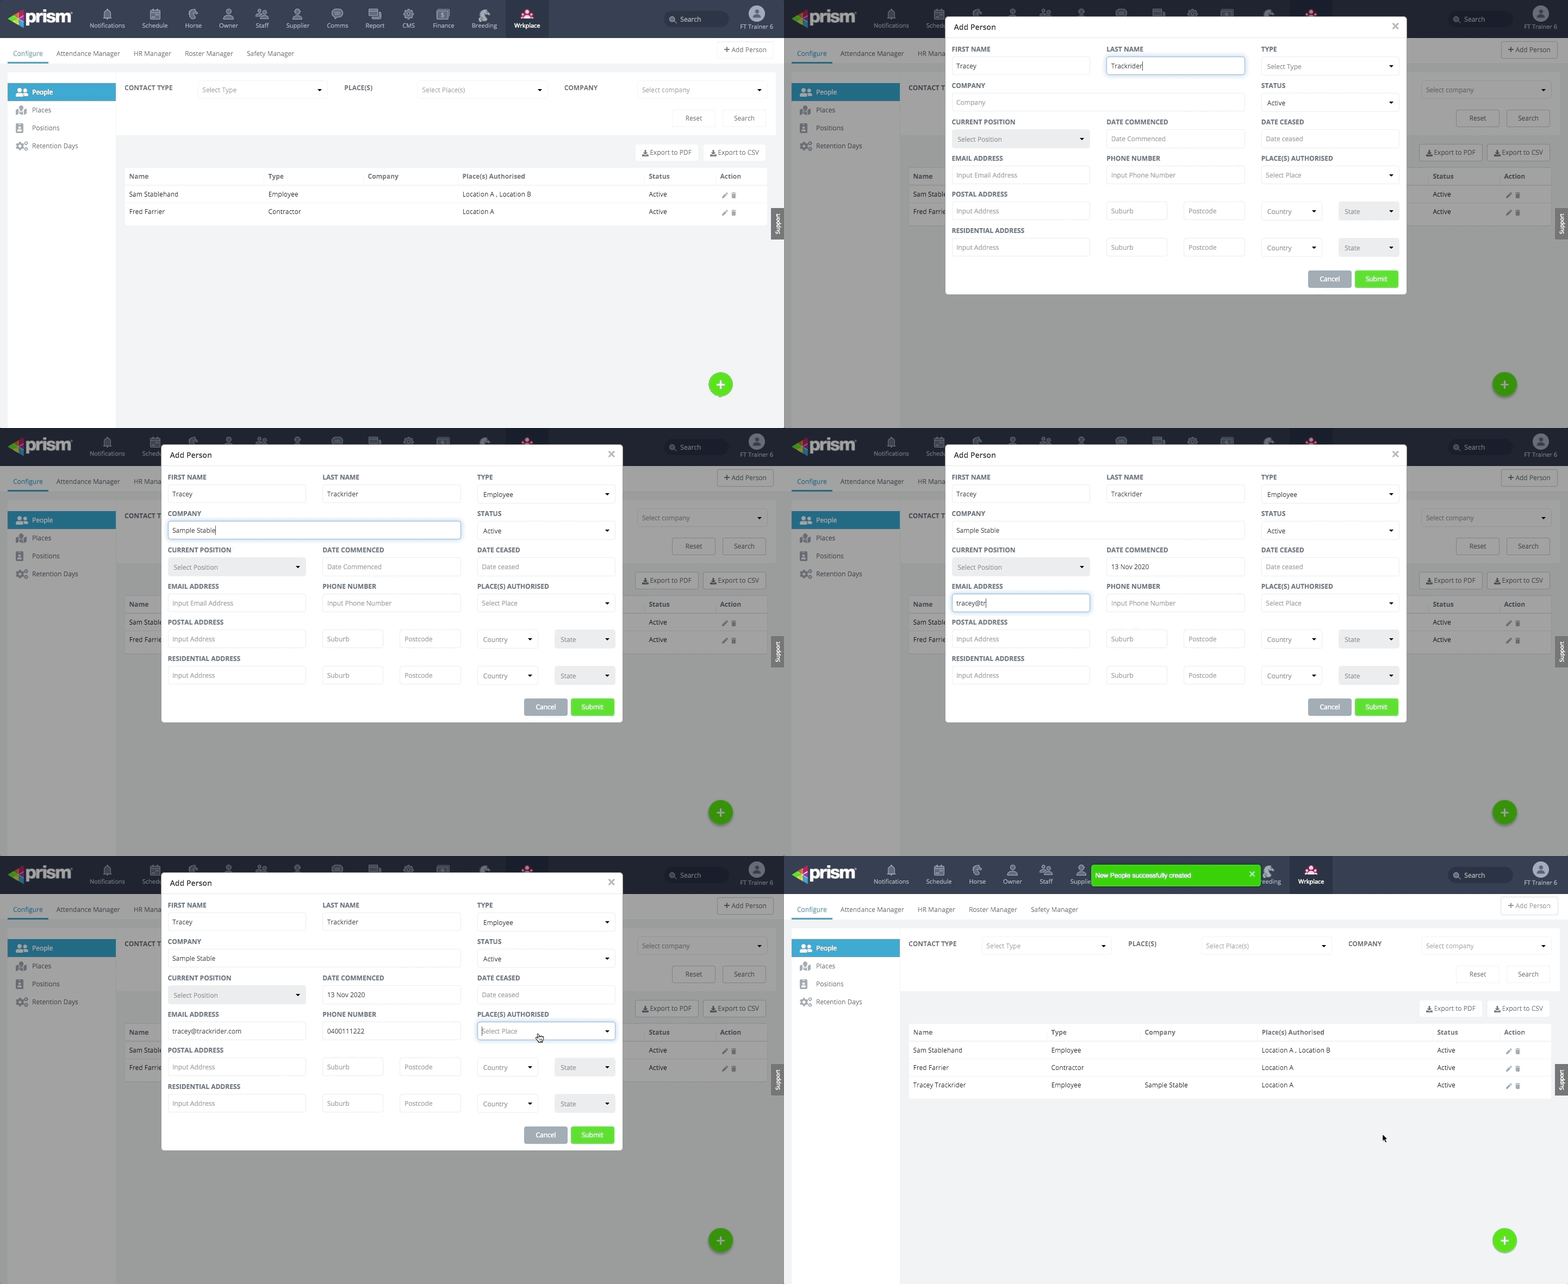
Navigate to Configure > People and click Add People.

Be sure to specify which Places (locations) each employee and contractor can work in.

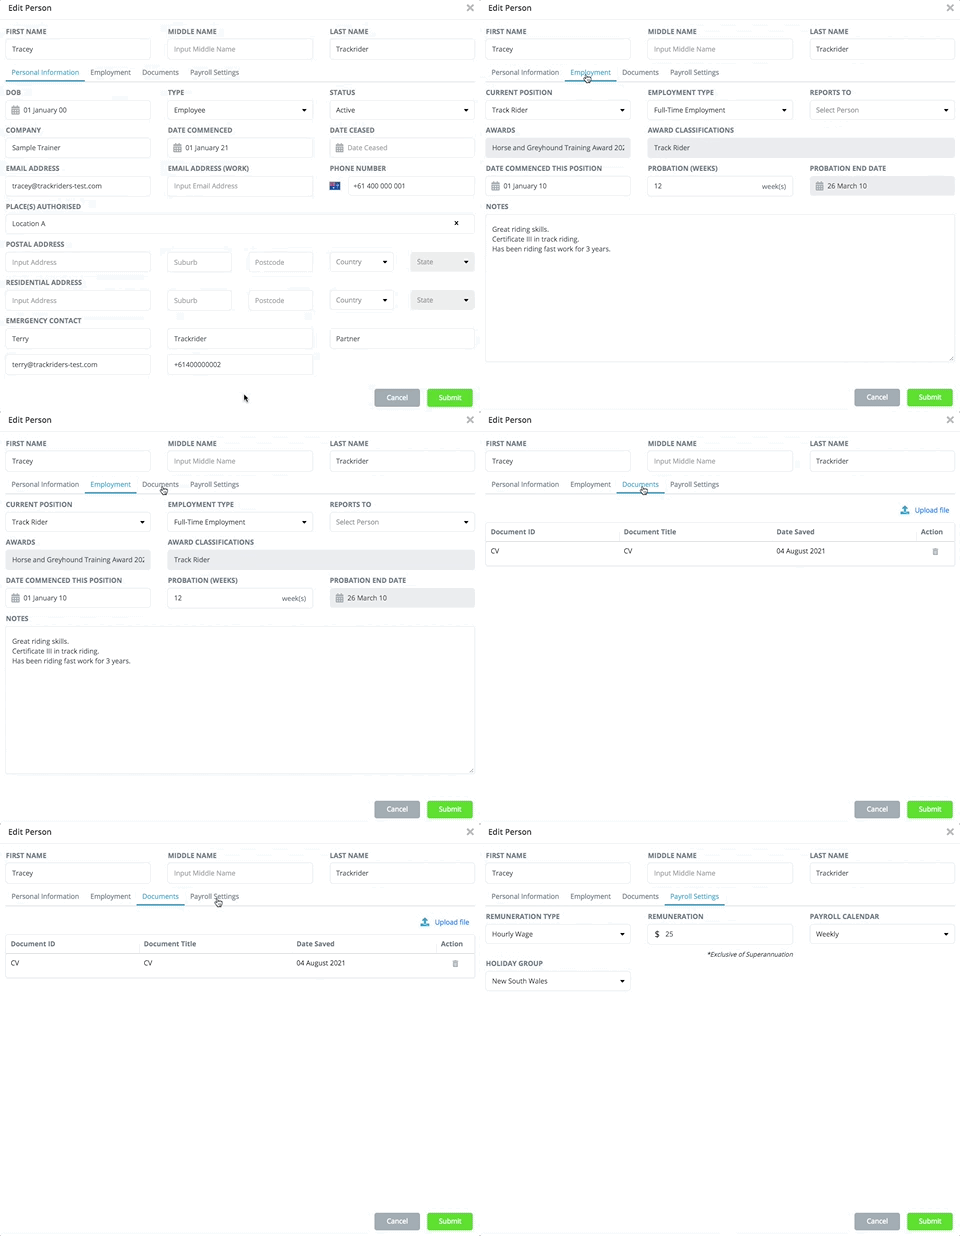
Where the person type is recorded as an Employee, additional information tabs allow you to record employment and payroll data, and upload documents. This data is critical at the time of offering a position to a candidate, and during the employment of each employee.

In addition to the standard contact details and emergency contact details for each employee and contractor, the additional content to store includes:

Employment

Current Position

Employment Type

Reports To

Date Commenced Position

Hours per Week / Fortnight / Month

Probation (Weeks)

Notes

Documents

Upload File, then enter:

Document ID (select)

Document Title

Date Saved (auto populated)

Payroll Settings

Remuneration Type

Remuneration ($)

Payroll Calendar

Holiday Group


Add Places

Your Wrkplace subscription allows you to setup as many workplaces (Places) as necessary. There are no limits to Places you can add into Wrkplace.

If you are using the Wrkplace Attendance module, each Place will require attendees to sign-in and sign-out. A unique Sign-In Poster with QR code is generated for each Place.

You can also specify which Places each Employee and Contractor is authorised to work at, in the People records.

If you are using the Wrkplace Recruitment module, a Place is assigned to each Job vacancy so the Place’s location (Country, State and City) appears on each job advert.

Here is how to setup your Places of work.

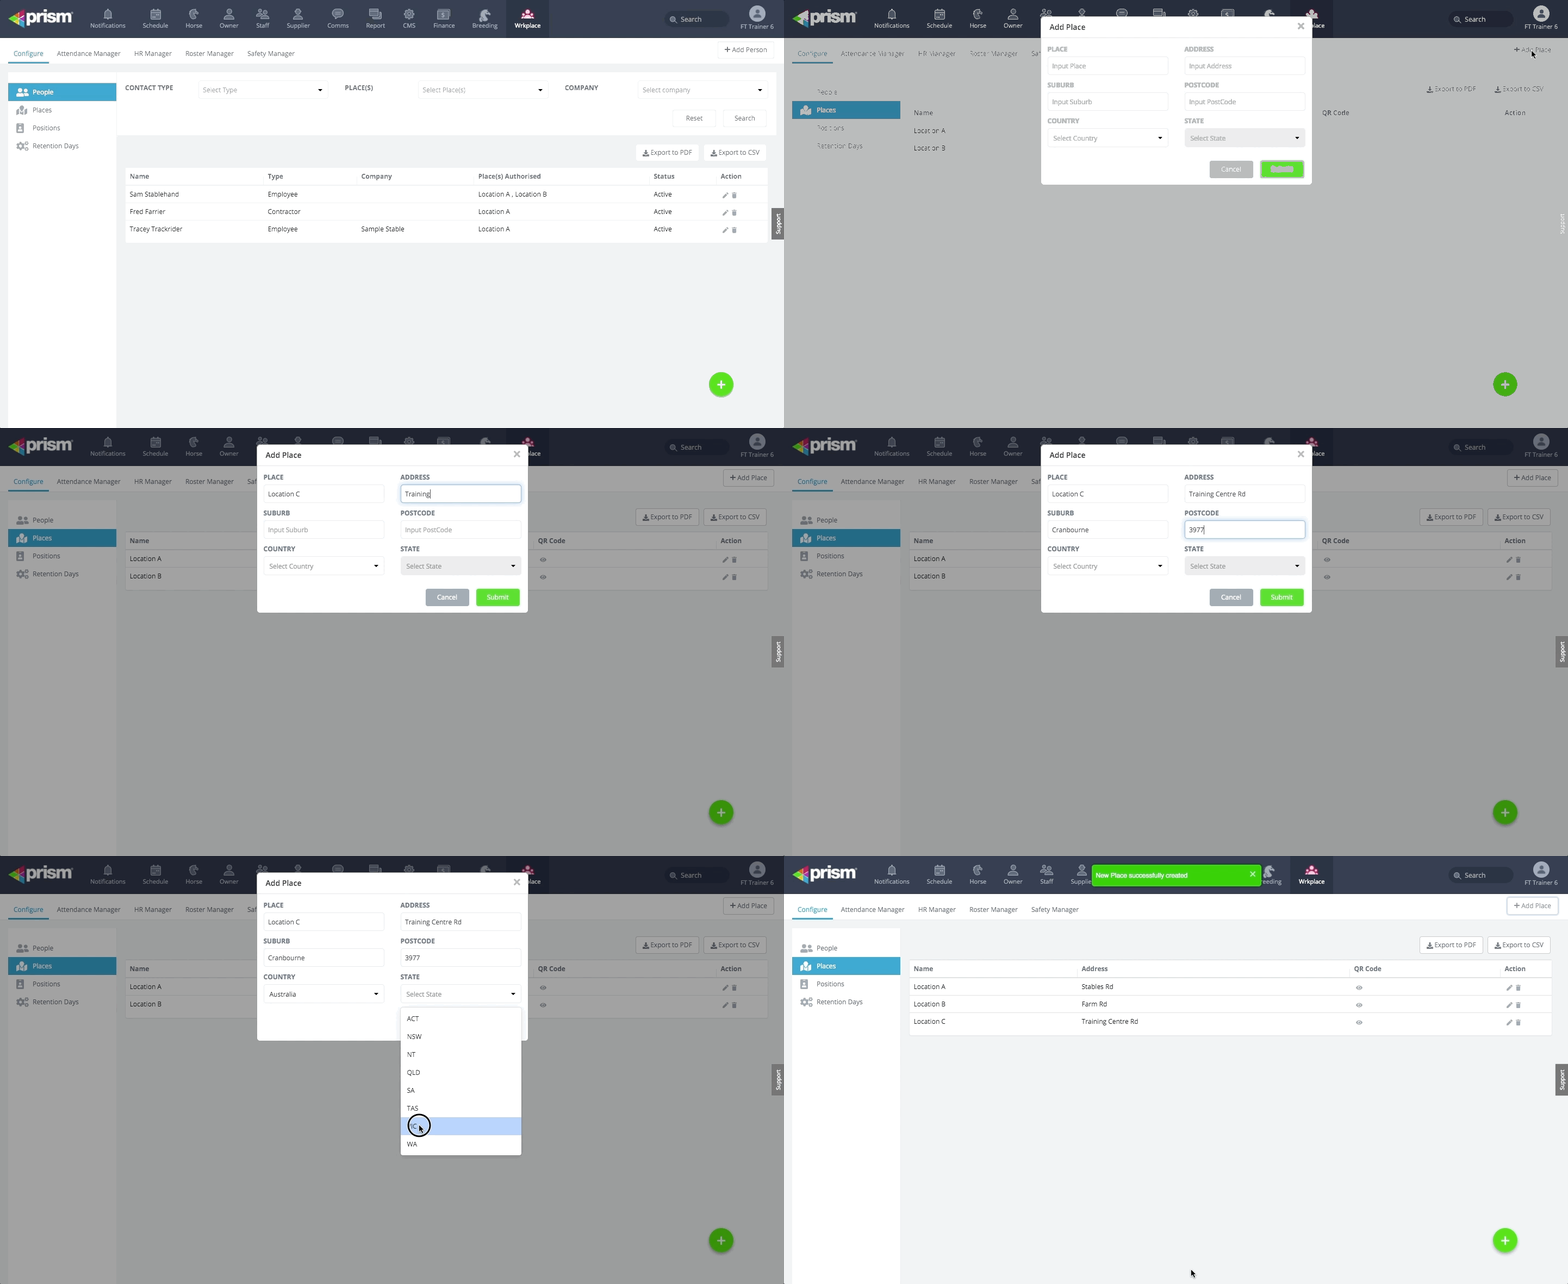
Navigate to Configure > Places and click Add Place.

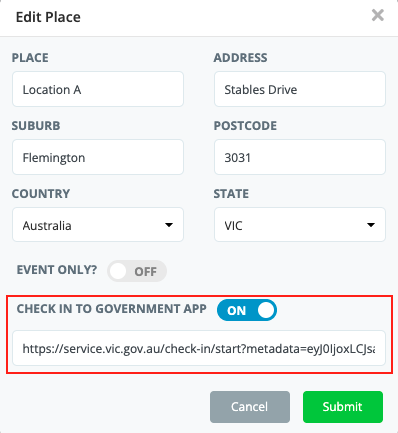
Optionally choose to direct all attendees to your country/state government’s check-in app for contact tracing purposes, as the last step when attendees re signing in to your workplace. This complies with government directions and also eliminates the need to display two QR check in codes. You will only need one QR check in code – Wrkplace.

There are a few steps involved to achieve this.

  1. Email us your government’s check in poster for your location(s).
  2. We will decode the QR code on that poster and record the redirection link required, and email that to you.
  3. Navigate to Configure > Places
  4. Edit each Place for which you wish to redirect attendees to the government app
  5. Click the option “CHECK IN TO GOVERNMENT APP” to ON.
  6. Paste the location-specific redirection link we provide you.

If you choose to direct all attendees to check in to the applicable government contact tracing app, a COMPLETE YOUR CHECK IN button will appear to all attendees upon successful sign in. This will open the applicable government app on their device.